Creating a website with Symonfy 4: Part 3
In today’s post we’ll be adding the ability to ask questions! If you haven’t been following along, this is a tutorial series so if you want to start from the beginning check out this post first. If you want to jump ahead, click here, to download a copy of the code. In this part we’re going to be adding some menu links and showing different ones depending on if the user is logged in, we’ll create the form to ask a question and then a page that displays the question. Let’s get started!
Adding Menu Links
To add menu links, let’s open up the base.html.twig file in the templates directory. Just under this line:
<a class="navbar-brand" href="/">Question/Answer</a>
Add the following bit of code:
<button class="navbar-toggler" type="button" data-toggle="collapse" data-target="#navbarMenu">
   <span class="navbar-toggler-icon"></span>
</button>
<div class="collapse navbar-collapse">
   <ul class="navbar-nav ml-auto">
	   <li class="nav-item">
		   <a class="nav-link" href="">Log In</a>
	   </li>
	   <li class="nav-item">
		   <a class="nav-link" href="">Sign Up</a>
	   </li>
	   <li class="nav-item">
		   <a class="nav-link" href="">Log Out</a>
	   </li>
   </ul>
</div>
This will add some links to our navbar, but they don’t link anywhere just yet. In Twig, there’s a function we can use to generate URLs using route names. So rather than hardcode links, we’re going to use the route names we used in our code. The function is called path and the first parameter is the route name. To output something like a variable or the result of a function, you put it in between double brackets {{ }}. So for example, to output a url to the homepage, you’d type:
{{ path('main') }}
Now that you know that, try filling out the hrefs for each of the links in our menu. If you need help or are finished take a look at my code below:
<ul class="navbar-nav ml-auto">
   <li class="nav-item">
	   <a class="nav-link" href="{{ path('app_login') }}">Log In</a>
   </li>
   <li class="nav-item">
	   <a class="nav-link" href="{{ path('app_register') }}">Sign Up</a>
   </li>
   <li class="nav-item">
	   <a class="nav-link" href="{{ path('app_logout') }}">Log Out</a>
   </li>
</ul>
Now, we have our 3 menu links but we don’t really want to show the log out link when someone isn’t logged in. We also wouldn’t want to show the sign up and login links when someone is already logged in. To check if a user is logged in, you can access a special object variable that’s available anywhere inside a Twig template. It’s called app and if there’s a user logged in, app will have a user property with the logged in user attached to it. If a user isn’t logged in app.user will be equal to null.
We can use an if statement to check if there is an app.user, and show the logout link if there is and show the other links if there isn’t. We saw how to use an if statement in Twig when we were working on the login page. It was auto-generated for us, but we did see how it was used when displaying if there was a login error or not.
To go over how to use a Twig if statement a little more, it’s pretty similar to how you’d use it in regular PHP. Here’s an example:
{% if condition1 %}
	Content for condition 1 would go here
{% elseif condition2 %}
	Content for condition 2 would go here
{% else %}
	All other content would go here
{% endif %}
So knowing how to set up an if statement and knowing how to tell if a user is logged in, try updating our menu to only show the logout link if the user is logged in. Also update it to only show the login and sign up links if the user is logged out.
Once you’re done with that or need help take a look at my code:
<ul class="navbar-nav ml-auto">
   {% if app.user %}
	   <li class="nav-item">
		   <a class="nav-link" href="{{ path('app_logout') }}">Log Out</a>
	   </li>
   {% else %}
	   <li class="nav-item">
		   <a class="nav-link" href="{{ path('app_login') }}">Log In</a>
	   </li>
	   <li class="nav-item">
		   <a class="nav-link" href="{{ path('app_register') }}">Sign Up</a>
	   </li>
   {% endif %}
</ul>
Cool! Test it out now while being logged in and logged out. You should only see the log out link when you’re logged in and the other links when logged out.
Now that we have a decent menu, let’s move on to creating a way for users to ask questions!
Creating the Question Entity
To allow a user to ask a question, we need to create a Question entity so we can store questions in our database. Similar to how we created the User entity, we can use a command line command to generate our Question entity. Type the following in your terminal:
php bin/console make:entity
This will start a prompt that will ask you a few questions about the entity you want to make. The first being the name. We’ll call it Question.
Then it will ask you what properties you want. The first will be named question, which will hold the actual question the user is asking. Next it will ask what type of field you want this to be. You can type ? to see all possible field types, but for this one we’re going to make it string. This equates to a varchar in our database. The next question it will ask is field length. We’ll allow 255 characters. Next it will ask if the field can be null, respond no to that since the question field should always have something in it.
Then it’s going to start the whole process again and ask if you want another field. Yes, we’re going to be adding 4 more fields. One that holds the user that asked the question, one that holds the question body or a longer version of the question if the user needs more than 255 characters. We’ll add another field that holds the amount of views and then one that holds the date it was asked. We’ll add the user field first.
So, to the property name question, respond user. For field type, we’re going to respond with relation. This will ask us a set of special questions that set up a relationship field. The first question it will ask is what class the entity is related to. To that, respond with User.
Then it will ask the type of relationship and will show you the options. They’re all the standard database relationships that you’ve probably seen if you’ve worked with databases previously: ManyToOne, OneToMany, ManyToMany and OneToOne. For this relationship, we’re going to use ManyToOne since each Question is going to be related to one User and each User can have many Questions.
Next it will ask if the user property is allowed to be null. Respond no to that since every Question must have a user. Then it will ask if we want to add a property to our User entity that will let us access all the user’s questions. This is just a helpful thing to have on our User entity so to that, respond yes. Then it will ask what you want the field in the User entity to be called. For that, respond questions. Then it will ask about orphan removal, which essentially means, if we remove a user from a question, that question will automatically get deleted. To keep our database clean of questions without users, we’ll respond yes to this.
Next we’ll add the body property. For field type use text and say yes to it being null.
Then we’ll add the views property. For field type use integer and the field should not be null.
Lastly, we’ll add a created property. For field type respond with datetime and respond no to the field being null. Then press enter again to stop adding fields.
Our Question entity has now been created! If you look inside the src/Entity folder you’ll see Question.php. Open that up and take a look. It should look a little similar to the User entity. It has some private properties and getters and setters. Also, open up the User.php file to see how it’s added a new property called questions. If you scroll down towards the bottom you’ll see its added 3 additional functions. getQuestions, addQuestions and removeQuestion. All of them are just helpful functions to let us work with Question entities through the User entity.
Ok great, now let’s go back into the Question entity as we need to modify it a little so our database is set up correctly. We need to tell our Question entity that the created property should have the default value of the current date and time. To do that we need to update the annotation above the $created property. Inside the parentheses next to type=”datetime”, add a comma and then add the following bit of code:
options={"default": "CURRENT_TIMESTAMP"}
So you’re full annotation should look like:
/**
  * @ORM\Column(type="datetime", options={"default": "CURRENT_TIMESTAMP"})
  */
That’s how you can add a default value to your table schema. We’re going to do the same for the $views property. We’ll set it so the default value is 0. We’re also going to set the default value of the $views property to 0 in code as well.
Note:
One thing to know when using Doctrine, it will always try to insert all of the properties that are mapped to a table column. So if our $views property is never set, it will use NULL for the value when inserting the record. To prevent this, we can set the default value by assigning it when the property is created. This isn’t as easy for the $created property since it needs to be an object. We can’t set a class property’s default value equal to an object. So, to get around this we’ll need to set it when we eventually save a new Question. There’s other ways we can do this as well, but for this tutorial that’s how we’ll do it.
Here’s the updated code after making those changes:
/**
  * @ORM\Column(type="integer", options={"default": "0"})
  */
private $views = 0;
Next we need to make a migration file. To do that, in your terminal type the following:
php bin/console make:migration
Then type the following to run the migration and update your database:
php bin/console doctrine:migrations:migrate
It will ask if you’re sure, respond with y.
And your database will be updated with the question table! Take a look at in MySQL workbench or phpMyAdmin. You’ll notice that our user property was converted to user_id. Doctrine does some magic behind the scenes to convert our relationship property to an actual user object.
Creating the Question Form
To create the question form we’re going to use another make command. So in the terminal type:
php bin/console make:form
The first question will ask the name of the form class. For this put QuestionType. For the Entity that should be bound to this form, put Question. This will create a new file in the src/Form folder called QuestionType.php. Open it up and we’ll take a look at it!
It should look pretty similar to the one we made for our sign up form. It has a buildForm and configureOptions method. Symfony has automatically added fields for each of the Question properties. Of course, some of those properties shouldn’t have form fields, so we’ll need to modify the buildForm method a little.
The only two fields we really want are the question and body fields. So to start, let’s remove the others. After doing that your buildForm method should look like this:
public function buildForm(FormBuilderInterface $builder, array $options)
{
   $builder
	   ->add('question')
	   ->add('body')
   ;
}
Next we should add some validation to this. We’ll need to make the question field limited to 255 characters and we need to make the body field optional. Also, by default the fields are regular text fields so we need to tell Symfony to use a textarea for the body field. We’ll start with the field types.
To add a textarea field, we need to set the second parameter of the add method to TextareaType::class. You’ll need to add this use statement to the top of your file in order to use it:
use Symfony\Component\Form\Extension\Core\Type\TextareaType;
After doing this, your buildForm method should look like this:
public function buildForm(FormBuilderInterface $builder, array $options)
{
   $builder
	   ->add('question')
	   ->add('body', TextareaType::class)
   ;
}
Next we’ll work on validation for our question field. If you remember from the RegistrationFormType class we worked on in the last part, to add validation we add a third array parameter to the the add method. The array should have a key called constraints that holds an array of Symfony Constraint objects. We’re going to use the NotBlank constraint and the Length constraint in our QuestionType class, just as the RegistrationFormType class is using them. If you want you can peek at that class to get an idea of what you need to do.
In order to use those constraints, you need to add the following use statements to the top of your file:
use Symfony\Component\Validator\Constraints\Length;
use Symfony\Component\Validator\Constraints\NotBlank;
The NotBlank constraint takes an array in the constructor where you can configure it. Set the message key to the message you want to display if the field is left blank.
The Length constraint also takes an array as the constructor. It accepts a min, max, minMessage, maxMessage, exactMessage, charset and charsetMessage. We’ll just be using the max and maxMessage keys for our constraint. Set max equal to 255 and maxMessage equal to “Your question can only be {{ limit }} characters long.”. The {{ limit }} is a special placeholder variable that you can use. It will be replaced with whatever you put for the max value. That way if you ever change the max value, you don’t need to change it in both places.
In order to set the third parameter we need to give something for the second parameter when we’re adding the question field. You can use either TextType::class or null since TextType is the default.
As always, if your up to it, try making those changes on your own. If you’re done or need some help, take a look at my code below:
public function buildForm(FormBuilderInterface $builder, array $options)
{
   $builder
	   ->add('question', null, [
		   'constraints' => [
			   new NotBlank([
				   'message' => 'Your question may not be blank.'
			   ]),
			   new Length([
				   'max' => 255,
				   'maxMessage' => 'Your question can only be {{ limit }} characters long.'
			   ])
		   ]
	   ])
	   ->add('body', TextareaType::class)
   ;
}
Next we need to tell Symfony to allow the body field to be empty. To do that we need to add a third parameter to the add method. It should be an array, just like the question one, except this time instead of adding a constraints key, we’re going to add a required key. Set required equal to false to make it not required.
Here’s what your code should look like after adding that:
public function buildForm(FormBuilderInterface $builder, array $options)
{
   $builder
	   ->add('question', null, [
		   'constraints' => [
			   new NotBlank([
				   'message' => 'Your question may not be blank.'
			   ]),
			   new Length([
				   'max' => 255,
				   'maxMessage' => 'Your question can only be {{ limit }} characters long.'
			   ])
		   ]
	   ])
	   ->add('body', TextareaType::class, [
		   'required' => false
	   ])
   ;
}
Next we need to create a controller function to display this form on a template. We’ll create a new controller for this. Yep, there’s a make command for that too! So in your terminal type:
php bin/console make:controller
Call it QuestionController.
This will create two new files. The first being the QuestionController.php file in the src/Controller folder. It will also create a template file named index.html.twig in the templates/question folder.
Open the QuestionController.php file and we’ll start on creating the controller function. The make command auto-generates the index function for us. We’ll use that one to display the question, but we need to make another function to show the “Ask a Question” form. So let’s create a function called askQuestion.
For the route annotation, the route will be /question/ask and the name will be app_question_ask. If you can, set that up yourself. Once you’re done, take a look at my code:
/**
  * @Route("/question/ask", name="app_question_ask")
  */
public function askQuestion()
{

}
Next, we need to create the form. It’s pretty similar to how it’s done in the RegistrationController. That was created for us automatically from the make:registration-form, but this time we need to write the code ourselves. You can refer to that controller to get an idea of what we need to do.
So, the first thing we need to do is create a new Question object. Then create the form using the $this->createForm method. We’ll pass the QuestionType::class as the first parameter to createForm and the second parameter will be our question object. Let’s code that out. Here’s what it looks like:
 /**
  * @Route("/question/ask", name="app_question_ask")
  */
public function askQuestion()
{
   $question = new Question();
   $form = $this->createForm(QuestionType::class, $question);
}
You’ll need to add the following use statements to the top of your file in order to be able to use the Question and QuestionType classes:
use App\Entity\Question;
use App\Form\QuestionType;
With the code we wrote we could technically output the form. We need to create a template file first though. We’ll do that now, then work on processing a submitted form. To start, let’s create a new file in the templates/question folder called ask.html.twig. We’re going to extend the base.html.twig file like the other templates are doing. We’ll update the title block to say “Ask a Question” and we’ll add a body block. We can leave it empty for now though.
Here’s what that should look like:
{% extends 'base.html.twig' %}

{% block title %}Ask a Question{% endblock %}

{% block body %}

{% endblock %}
Ok, now that we have the template set up, let’s go back to the controller and render it in the controller. To do that, we’ll return $this->render and as the first parameter the path to the template file and then the second parameter will be an array with data we want to pass to the template. We want to pass the form to the template so add a questionForm key and set it equal to $form->createView().
Note:
If you’re wondering, the key doesn’t have to be called questionForm, its just what I decided to call it. You can call it whatever makes sense to you.
Your controller function should now look like this:
/**
  * @Route("/question/ask", name="app_question_ask")
  */
public function askQuestion()
{
   $question = new Question();
   $form = $this->createForm(QuestionType::class, $question);

   return $this->render('question/ask.html.twig', [
	   'questionForm' => $form->createView()
   ]);
}
Now that we can access the form in our template, let’s go back to the template file and update it to display our form. To display an entire form, if you don’t want to format the field positions in any way you’d pass the questionForm variable to the Twig form function. Here’s what that looks like:
{{ form(questionForm) }}
If we put that in between our body block, save and load up the /question/ask route you’ll see the form:
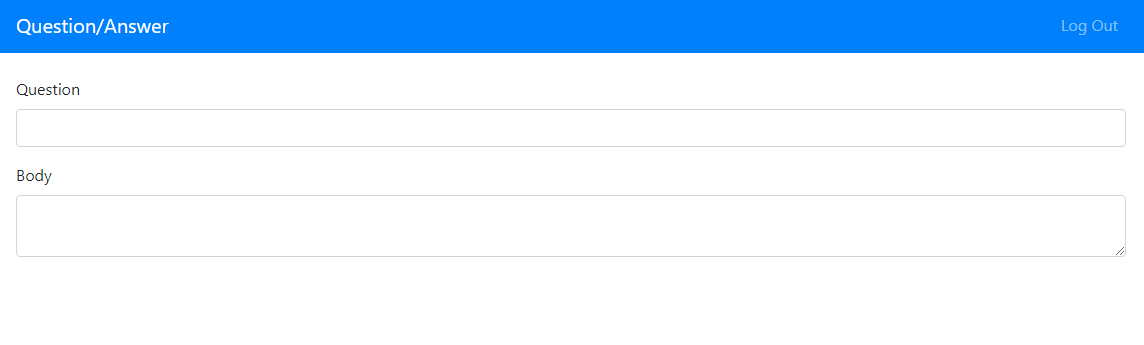
It’s missing a submit button and this page is accessible to people not logged in. We’ll fix the submit button issue first, then add something to prevent access to users who aren’t logged in.
There’s a few ways to add a submit button. We can set it up like the register.html.twig file and call the form_start, form_row and form_end functions and stick a button in between. But, since we’ve already seen that way, let’s try it another way. We can add the submit button inside the QuestionType class.
So go back to the QuestionType.php file in the src/Form folder. We’re going to chain another add method after the body field. The first parameter is the name of the field, we’ll call it submit. The second parameter is the field type. For this we need to use SubmitType::class. You’ll need to add this use statement to the top of your class to use that class:
use Symfony\Component\Form\Extension\Core\Type\SubmitType;
For the third parameter we need to give it an array. We’ll want to set the label for this button. To do that add a label key and set that equal to “Ask Question”. Here’s what your buildForm method should look like after coding this out:
public function buildForm(FormBuilderInterface $builder, array $options)
{
   $builder
	   ->add('question', null, [
		   'constraints' => [
			   new NotBlank([
				   'message' => 'Your question may not be blank.'
			   ]),
			   new Length([
				   'max' => 255,
				   'maxMessage' => 'Your question can only be {{ limit }} characters long.'
			   ])
		   ]
	   ])
	   ->add('body', TextareaType::class, [
		   'required' => false
	   ])
	   ->add('submit', SubmitType::class, [
		   'label' => "Ask Question"
	   ])
   ;
}
Once you save, you can reload the /question/ask page and you should now see the submit button! I want to do a few more things though to make this look a little better. The body textarea looks a little small for me. To make it bigger, we can update our QuestionType class. You can control the textarea attributes by adding an attr key to the third parameter array for the body field. attr should be an array of attributes that you’d normally see in a textarea html tag, like class, rows, cols, etc. We can set the rows attribute to change the height of it. Let’s set it to 5. Here’s what that looks like:
->add('body', TextareaType::class, [
   'required' => false,
   'attr' => [
	   'rows' => 5
   ]
])
Next let’s let the user know that the body field is optional. To do that we can update the label. We do that the same way we set the label for the submit button. Add a label key and set it to whatever we’d like. I’m going to put “Body (Optional)”.
->add('body', TextareaType::class, [
   'required' => false,
   'attr' => [
	   'rows' => 5
   ],
   'label' => 'Body (Optional)'
])
Save and then refresh the /question/ask page.
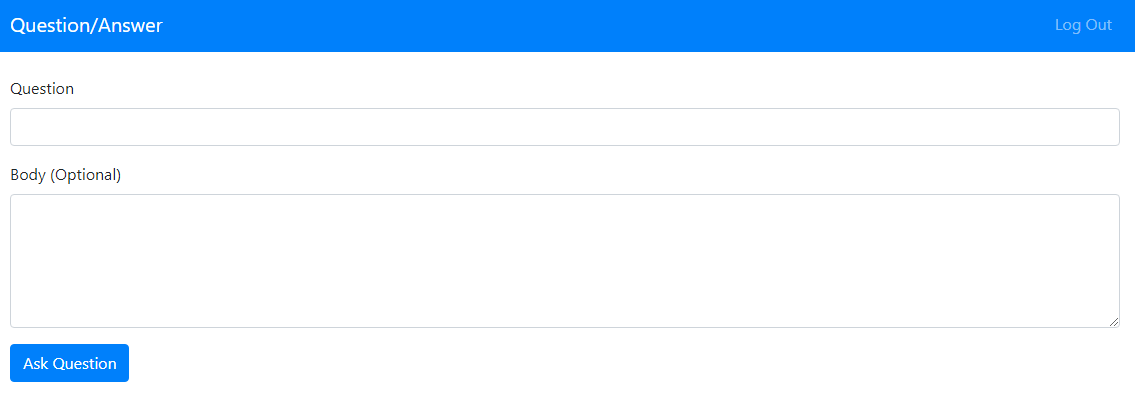
Great! Our form is looking a little nicer. I’m going to do a little more formatting in the ask.html.twig file so it doesn’t stretch out across the entire page. Since it’s not really Symfony related I’ll just give you the code below:
{% extends 'base.html.twig' %}

{% block title %}Ask a Question{% endblock %}

{% block body %}
   <div class="row">
       <div class="col-8 offset-2">
           {{ form(questionForm) }}
       </div>
   </div>
{% endblock %}
I’m mainly just wrapping the form in some divs with bootstrap classes that make it look not as stretched.
Preventing Access
There’s a few ways to prevent non-logged in users from accessing the Ask Question page. We saw in the last post how we can call $this->isGranted to check if the user has a certain role. We could do the same, but let’s try it a different way just to see other ways of controlling access. We’re going to do it as an annotation. Add the following bit of code under your route annotation:
@IsGranted("IS_AUTHENTICATED_FULLY")
This will check that the user accessing the page is logged in. Your full annotation will look like this:
/**
  * @Route("/question/ask", name="app_question_ask")
  * @IsGranted("IS_AUTHENTICATED_FULLY")
  */
You’ll need to add this use statement to the top of your file to use this annotation:
use Sensio\Bundle\FrameworkExtraBundle\Configuration\IsGranted;
Now if you try accessing the Ask Question page without being logged in, it will redirect you to the login page!
Processing the Form
Next we need to handle submitting the form. We do that in the controller, so open the QuestionController.php file and go to the askQuestion function. Just after the line:
$form = $this->createForm(QuestionType::class, $question);
We’ll add the code that processes the form. If you want to refresh your memory, we’re going to do something similar to what’s done in the register function in the RegistrationController.
The first thing we need to do is pass the request object to the form. We do this by calling the ,var>handleRequest method of the $form object. Then we pass a Request object to the handleRequest method. To get a Request object, we can add a parameter to the askQuestion function. If we type hint it as a Request object, Symfony will pass us a Request object. So let’s code that out! Here’s what it looks like:
public function askQuestion(Request $request)
{
   $question = new Question();
   $form = $this->createForm(QuestionType::class, $question);
   $form->handleRequest($request);

   return $this->render('question/ask.html.twig', [
	   'questionForm' => $form->createView()
   ]);
}
You’ll need to add this use statement to the top of your file to use the Request object:
use Symfony\Component\HttpFoundation\Request;
Then, we need to check if the form is submitted and valid. To do that we call the isSubmitted() and isValid() methods on the $form object. We’ll check if those are equal to true using an if statement. The form will automatically populate any of the mapped fields, so the question and body fields will be populated for us. We just need to set the user object. We can access the currently logged in user from $this->getUser(). So call the setUser method on the $question object and pass it $this->getUser().
Next we need to set the created date. We’ll pass the $question->setCreated() method a new \DateTime() object so the created date is basically set to now.
Then, we’re ready to save the question. To do that we need a Doctrine EntityManager object. To get that we call $this->getDoctrine()->getManager(). Then we call the persist method on the entity manager and pass it the $question object. And to fully save the question we call flush() on the entity manager. If you can code that out on your own, give it a try before looking at my code. Here’s what that looks like:
if($form->isSubmitted() && $form->isValid())
{
   $question->setUser($this->getUser());

   $entityManager = $this->getDoctrine()->getManager();
   $entityManager->persist($question);
   $entityManager->flush();

}
Lastly, we want to redirect to a page that displays the question. This will be a new page we’ll make next. The route will be called app_question. It will use an id that’s passed through the url to figure out which question to show. To redirect to a different route, we return $this->redirectToRoute and pass it the route name as the first parameter. The second parameter takes an array of route parameters. So we’ll pass an array with an id key equal to $question->getId().
Here’s the updated code with the redirect:
public function askQuestion(Request $request)
{
   $question = new Question();
   $form = $this->createForm(QuestionType::class, $question);
   $form->handleRequest($request);

   if($form->isSubmitted() && $form->isValid())
   {
	   $question->setUser($this->getUser());
	   $question->setCreated(new \DateTime());

	   $entityManager = $this->getDoctrine()->getManager();
	   $entityManager->persist($question);
	   $entityManager->flush();
	   return $this->redirectToRoute("app_question", ['id' => $question->getId()]);
   }

   return $this->render('question/ask.html.twig', [
	   'questionForm' => $form->createView()
   ]);
}
Now, before we try submitting our form, let’s update the QuestionController to at least have the new route we referred to when saving a question. We’ll use the index function for this. We’ll update the route to include a route parameter. A route parameter is essentially a dynamic value that can be passed to the url that we can read in our code.
In order to add a route parameter you surround it in single curly braces. So our route will look like this: /question/{id}.
We’ll also update the route name to be app_question instead of just question. We also need to add some requirements to the id parameter since having a route of /question/{id} could also match with our /question/ask route. To add requirements, we add a third parameter to our @Route annotation called requirements. It’s easier to show you first and then explain what it’s doing:
requirements={"id"="\d+"}
This is what a route parameter requirement looks like. We’re setting the id equal to a regex pattern. In this case it’s looking for any digit of any length. If you had more parameters and needed more requirements, you’d separate each with a comma.
Lastly, we’re going to add a Question parameter to the index function. Your index function will look like this after making those changes:
/**
  * @Route("/question/{id}", name="app_question", requirements={"id"="\d+"})
  */
public function index(Question $question)
{
   return $this->render('question/index.html.twig', [
	   'controller_name' => 'QuestionController',
   ]);
}
Ok, with that set up let’s test out our question form. Go back to /question/ask in your browser and then try submitting the form. Depending on your browser if you try not passing anything in the question field, it won’t even let you submit the form, but if you are able to, you should see a nicely formatted error message. When you pass a value in the question text box and submit, you’ll be redirected to something that looks like this:
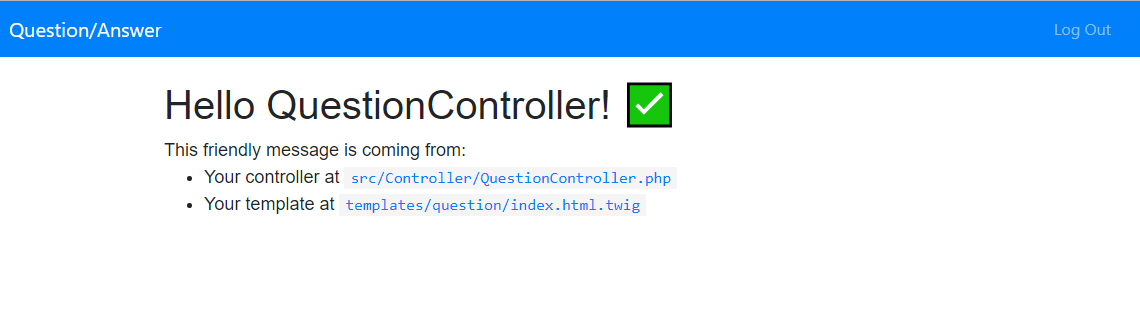
This is just the default controller page that gets generated from the make:controller command. You should also notice the id of the question is in the url. Great! We’ve saved a question! If you want, you can check that it was actually saved by looking at MySQL workbench or phpMyAdmin. We’ll work on displaying the question next!
Question Page
Let’s go back to the index function in the QuestionController so we can pass the question to the template. We have a Question object as one of the parameters to the index method. Symfony actually knows to grab the Question with the id we used in our route parameter. We don’t have to write any special code to grab the Question entity. The reason Symfony knows how to pull the correct Question is because we’ve named the parameter the same name as a property in the entity.
So with that, all we need to do to pass the $question to the template in the render method. Here’s what that looks like:
 return $this->render('question/index.html.twig', [
   'question' => $question,
]);
Then let’s head back to the index.html.twig file in the templates/question folder. We’ll delete everything in between the body block and we’ll update the title block to be “View Question”.
To display the question, you’d use the question variable we passed in from the controller and treat it like an object. So to display the question we’d do {{ question.question }}. To display the body we’d do {{ question.body }}. If you want, put those both in the body block and save the template just to see it working.
Great! You should see both the question and the body (if you gave a question body when you submitted your form). Let’s now wrap that in some bootstrap to make it pretty. Here’s what I came up with:
{% extends 'base.html.twig' %}

{% block title %}View Question{% endblock %}

{% block body %}
   <h3 class="text-center"> {{ question.question }}</h3>

   {% if question.body %}
   <div class="row">
       <div class="col-8 offset-2">
       <div class="card">
           <div class="card-body">
               <p class="card-text">{{ question.body }}</p>
           </div>
           <div class="card-footer text-muted small">

           </div>
       </div>
       </div>
   </div>
   {% endif %}
{% endblock %}
I’m putting the main question in h3 tags and centering it. Then I’m checking to see if there is something for the question body and only showing it if it’s there.
One last thing I want to do is add the date to the question. To do that we can’t just do: {{ question.created }}. Since question.created is a DateTime object, it can’t be output directly. We need to pass it through a Twig filter. The filter is, simply enough, called date. To pass the created date to the filter you’d call it like: {{ question.created|date }}. We’ll add this to the card-footer section like so:
<div class="card-footer text-muted small">
   {{ question.created|date }}
</div>
Note:
You can format the date by passing the same format characters used in the normal PHP date function. So for example if you wanted to format the date to look like 03/01/2019 7:00 am, you’d do: {{ question.created|date(“m/d/Y h:i a”) }}
After saving your template and reloading your question page, it should look something like this:
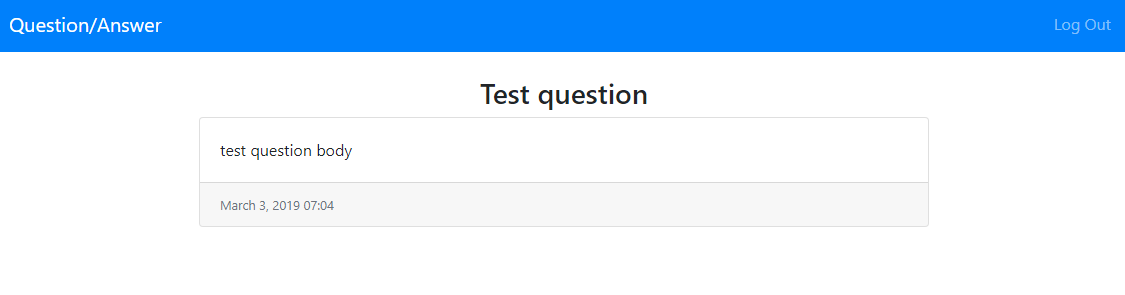
Great! We now have a nicely formatted question page!
I think that’s a good spot to stop for now. We’ve learned a lot in this part. We built out our own form, coded out how to process it and also how to display it. We also learned how to tell if a user is logged in through Twig and we created our Question entity. In the next part we’ll work on adding a way to answer a question and work on displaying all the questions on the home page!
If you have any questions feel free to comment below and if you want to know when the next part comes out be sure to subscribe!
Click here to view the next part!