Today we’re going to build a simple real time chat app with Websockets and Symfony 5! I’d recommend you at least know the basics of Symfony and feel comfortable with Javascript before starting this tutorial.
1. Setting up our app
To start, let’s get a skeleton Symfony app up. Open a terminal and go to a directory where you want your app to be and type:
composer create-project symfony/skeleton app
This will create an “app” folder with a base Symfony app. Go into that folder and then we’ll install a few more libraries.
Next we need to install a library that will let us set up a websocket server. There’s a bunch you can use however, the most popular/most kept up to date looks like it’s RatchetPHP.
To install it, type the following in your terminal:
composer require cboden/ratchet
Note:
As of this writing, the pull request to update RatchetPHP for Symfony 5 hasn’t been merged in yet. However it is passing all tests. If you are looking to use this in production, I would wait until it’s been merged in. But if you’re just here to learn, then it’s fine to use as is.
To use the branch that has the Symfony 5 update, you’ll need to add the following to your composer.json file:
"repositories": [{
	"type": "vcs",
	"url": "https://github.com/simPod/Ratchet.git"
}],
This will add the forked repo with the Symfony 5 fix of the Ratchet library. Adding this allows us to use composer to install the branch with the fix.
Here is what the top portion of your composer.json file should look like after adding that:
{
    "type": "project",
    "license": "proprietary",
    "repositories": [{
        "type": "vcs",
        "url": "https://github.com/simPod/Ratchet.git"
    }],
    "require": {
        "php": "^7.2.5",
        "ext-ctype": "*",
        "ext-iconv": "*",
        "symfony/console": "5.0.*",
        "symfony/dotenv": "5.0.*",
        "symfony/flex": "^1.3.1",
        "symfony/framework-bundle": "5.0.*",
        "symfony/yaml": "5.0.*"
    },
...
Next you will need to install the library using the specific fixed branch. To do that type in your terminal:
composer require cboden/ratchet:dev-allow-symfony-5
And that should install without any errors.
Next let’s install the annotations library to handle routes, the maker bundle and the twig template library. These aren’t specific to websockets, we’re just going to use them for the tutorial.
Type the following to install those:
composer require twig
composer require annotations
composer require symfony/maker-bundle --dev
Once those are installed, we’re ready to start setting up our Websocket server!
2. Websocket Message Handler
Before we setup the actual server, we need to create a class that can handle sending and receiving any messages that comes into our websocket server. So to start, let’s create a folder called “Websocket” inside our src/ directory. Then create a file in there called MessageHandler.php.
Our MessageHandler will implement MessageComponentInterface, one of the interfaces that comes from the Ratchet library. Here’s the basic setup for the class:
<?php
namespace App\Websocket;

use Exception;
use Ratchet\ConnectionInterface;
use Ratchet\MessageComponentInterface;


class MessageHandler implements MessageComponentInterface
{

    public function onOpen(ConnectionInterface $conn)
    {

    }

    public function onMessage(ConnectionInterface $from, $msg)
    {

    }

    public function onClose(ConnectionInterface $conn)
    {

    }

    public function onError(ConnectionInterface $conn, Exception $e)
    {

    }
}
As you can see, there’s 4 functions that the interface has us make: onOpen, onMessage, onClose and onError. onOpen is called when a new connection is made with our websocket server. onMessage is called when a message is sent to our websocket server. onClose is called when someone disconnects from our server and onError is called when an error occurs.
Before we get to those functions however, we need to setup some other code that will allow us to keep track of all the connections that join our server.
So, add a new protected property to the class called $connections and setup a constructor that initializes this property to a new SplObjectStorage object. SplObjectStorage is a regular PHP object so you can use it by including a \ before the class name or adding a use statement to the top of your file.
If you can, try updating the class based on what I wrote above. When you’re done or need help, here’s what the top portion of the class should now look like:
<?php
namespace App\Websocket;

use Exception;
use Ratchet\ConnectionInterface;
use Ratchet\MessageComponentInterface;
use SplObjectStorage;

class MessageHandler implements MessageComponentInterface
{

    protected $connections;

    public function __construct()
    {
        $this->connections = new SplObjectStorage;
    }
If you don’t know, SplObjectStorage acts similar to an array. It is essentially a collection of objects. We’re using SplObjectStorage in this case so that we can identify specific connections, which isn’t as easy to do with a regular array. You’ll see how we use it as we continue building out this class.
Now that we have that setup, let’s handle actually keeping track of all connections. To do that we need to add any new connection that joins to our $connections property. SplObjectStorage has a method called attach, which lets us add objects to the collection.
So, as I wrote above, the onOpen method is called whenever a new connection joins our server. The $conn parameter that’s passed in is that new connection, so let’s add that to our $connections property by adding the following to our onOpen function:
public function onOpen(ConnectionInterface $conn)
{
	$this->connections->attach($conn);
}
Next, let’s update our onClose method to handle removing the connection from our collection. To do that you call the detach method. Here’s what that looks like:
public function onClose(ConnectionInterface $conn)
{
	$this->connections->detach($conn);
}
Next, let’s handle what happens when an error occurs. We’ll disconnect the connection as well as remove it from our collection.
public function onError(ConnectionInterface $conn, Exception $e)
{
	$this->connections->detach($conn);
	$conn->close();
}
Finally we’ll work on the onMessage function. This is the function that will likely end up doing a lot of the work if you end up extending your websocket server passed this tutorial. In this function we’ll take in the message and pass it along to all the other connections we have on our server.
Here’s what that code looks like:
public function onMessage(ConnectionInterface $from, $msg)
{
	foreach($this->connections as $connection)
	{
		if($connection === $from)
		{
			continue;
		}

		$connection->send($msg);
	}
}
Here we’re looping through the connections. First we check to see if the connection we’re on in the loop is the one that sent the message and skipping it if so. Since the connection that sent the message already knows the message, we don’t need to send it.
Then lastly we’re calling the send method to pass the message along.
That’s our MessageHandler class setup! We can now use this to create the actual websocket server.
3. Websocket Server
To create the Websocket server, we’re going to create a Symfony command line tool. We technically could make this a stand-alone script, however for the sake of using Symfony, we’ll make it a command.
So, in your src/ folder create a folder called Command. Then create a new PHP file called WebsocketServerCommand.php.
If you’ve never made a command in Symfony before, it’s actually pretty simple. You create a class that extends Symfony’s Command class and then you just need to have a protected function called execute which holds the code that runs when you run the command in a terminal. You can read more about them here.
So to start let’s set up the class. Here’s how to do that:
<?php
namespace App\Command;

use Symfony\Component\Console\Command\Command;
use Symfony\Component\Console\Input\InputInterface;
use Symfony\Component\Console\Output\OutputInterface;

class WebsocketServerCommand extends Command
{
    protected function execute(InputInterface $input, OutputInterface $output)
    {

    }
}
As you see the execute function takes an $input and $output parameter, which naturally are used to handle any input and also display any output.
Here’s the code to create and run the server:
$server = IoServer::factory(
	new HttpServer(
		new WsServer(
			new MessageHandler()
		)
	),
	$port
);
These classes, except for the one we just made (MessageHandler) all come from the Ratchet library.
So, we’ll add this to our execute function to create the server.
Here’s that code:
protected function execute(InputInterface $input, OutputInterface $output)
{
	$port = 3001;
	$output->writeln("Starting server on port " . $port);
	$server = IoServer::factory(
		new HttpServer(
			new WsServer(
				new MessageHandler()
			)
		),
		$port
	);
	$server->run();
	return 0;
}
The only differences here are that I’ve initialized the $port to 3001. This can be any unused port number. If you want to get fancy you can ask for a port when this command is ran, but it’s not necessary. I’ve added some code to output in the terminal that the server is starting on port 3001. Lastly, I’m returning 0. As of Symfony 5, the execute function for Symfony commands must return an int. There’s no real reasoning behind returning 0 in our case other than to prevent errors.
One final thing we’ll add to this class is the name of the command. To do that we need to add a protected static property called $defaultName to the class. I’ve called my name “run:websocket-server”. Here’s what the full class looks like after adding that:
<?php
namespace App\Command;

use Ratchet\Http\HttpServer;
use Ratchet\Server\IoServer;
use Ratchet\WebSocket\WsServer;
use App\Websocket\MessageHandler;
use Symfony\Component\Console\Command\Command;
use Symfony\Component\Console\Input\InputInterface;
use Symfony\Component\Console\Output\OutputInterface;

class WebsocketServerCommand extends Command
{
    protected static $defaultName = "run:websocket-server";

    protected function execute(InputInterface $input, OutputInterface $output)
    {
        $port = 3001;
        $output->writeln("Starting server on port " . $port);
        $server = IoServer::factory(
            new HttpServer(
                new WsServer(
                    new MessageHandler()
                )
            ),
            $port
        );
        $server->run();
        return 0;
    }
}
Now we can test out running the command in our terminal! Type the following:
php bin/console run:websocket-server
If all went correctly, you should see the message “Starting server on port 3001”.
Great! That’s all the backend stuff needed to set up our server. Now we need to do a little frontend work. For now, you can close the server by pressing ctrl+c in your terminal.
4. Controller and Frontend Code
Next, let’s set up a page that we can visit to interact with the websocket server. First let’s create a controller. In your terminal type the following:
php bin/console make:controller
When it asks for a name, type WebsocketController. The name isn’t super important, it can be whatever you’d like.
This will create our controller class as well as a template file for us. If you open the WebsocketController.php file in the src/Controller folder, you’ll see it has a route of /websocket and that it is rendering the websocket/index.html.twig view file.
Let’s change the route to to / so this page becomes our index page. That’s the only modification we’ll make to the controller.
Here’s the code if you want to compare:
<?php

namespace App\Controller;

use Symfony\Bundle\FrameworkBundle\Controller\AbstractController;
use Symfony\Component\Routing\Annotation\Route;

class WebsocketController extends AbstractController
{
    /**
     * @Route("/", name="websocket")
     */
    public function index()
    {
        return $this->render('websocket/index.html.twig', [
            'controller_name' => 'WebsocketController',
        ]);
    }
}
Now if you access your app from a browser, the starter template should show.
Note:
I’m using the symfony binary to run a development web server. Go her: https://symfony.com/download to download it, and then run:
symfony serve
from your app directory in your terminal to run the web server.
Next, let’s open the templates/websocket/index.html.twig file. We’re going to clear out the body block and replace it with the following:
{% block body %}
<style>
    body {
        font-family: arial;
    }

    .form-group {
        margin-bottom: 10px;
    }

    input {
        border: solid lightgrey 1px;
        padding: 8px;
    }

    label {
        display: inline-block;
        min-width: 150px;
    }

    #chat {
        height: 400px;
        width: 600px;
        border: solid lightgrey 1px;
        overflow: auto;
        margin-bottom: 20px;
    }

    button {
        padding: 6px 12px;
    }

    .message {
        padding: 10px 5px;
        margin-bottom: 10px;
        border-bottom: solid lightgrey 1px;
    }
</style>


<div id="chat">

</div>
<div>
    <div class="form-group">
        <label for="name">Name:</label> <input type="text" id="name">
    </div>
    <div class="form-group">
        <label for="message">Message:</label> <input type="text" id="message">
    </div>
    <button type="button" id="sendBtn">Send</button>
</div>
{% endblock %}
This is just some html for a simple chat app. I won’t go through it since it’s all regular HTML, but feel free to customize it however you’d like. If you do want to modify it, the only important bits that you should keep to follow along with the tutorial are the id’s of the elements.
If you go to your site in a browser it should look like this:
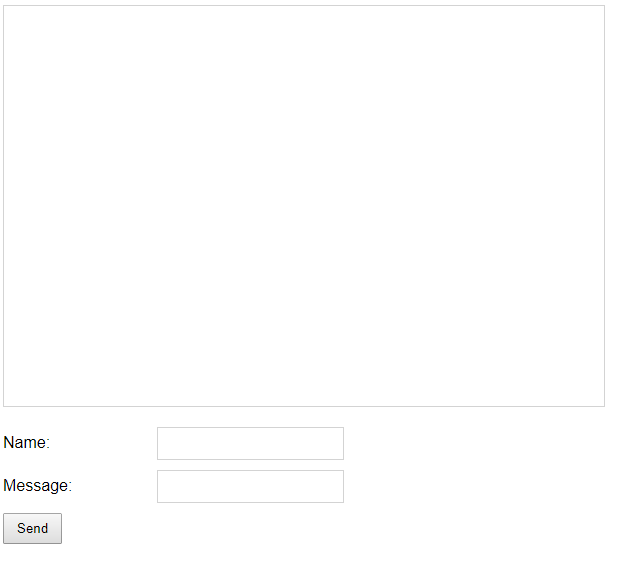
Currently the form does nothing. We’re going to make it work next!
Step 5: More Frontend – Javascript
Javascript has a WebSocket object that we can use to connect to our server. Before we can connect, we need to start the websocket server. So, in a terminal (you may need to start a second if you are using the Symfony dev web server), start your websocket server:
php bin/console run:websocket-server
Now that the websocket server is running, we can connect to it! To do that we need to add some javascript to our twig template. Just under the html add a script tag and add the following bit of code:
<script type="text/javascript">
    const socket = new WebSocket("ws://localhost:3001");

    socket.addEventListener("open", function() {
        console.log("CONNECTED");
    });
</script>
Here we’re initializing a WebSocket object and passing in the url to our websocket server. Since we’re running it locally we can access it from localhost and we used port 3001 (change this to the port number you used if you used something different).
Then we’re adding an event listener to the websocket that runs when the open event is initiated. This means that we’re connected to the server.
Next we want to be able to pass messages to the server. We use the send method of our websocket object to send messages. We’ll send a serialized object that contains the values in our name and message input fields when someone clicks the Send button.
Based on what I wrote above, if you think you can write that on your own, give it a shot.
Here’s the code:
document.getElementById("sendBtn").addEventListener("click", function() {
	const message = {
		name: document.getElementById("name").value,
		message: document.getElementById("message").value
	};
	socket.send(JSON.stringify(message));
});
As I wrote above the code, here we’re creating an object with the name and message, using JSON.stringify to serialize it and using the send method to send a message to our websocket server.
To quickly see if it’s working, we can add another event listener to our websocket object that listens for the message event. Here’s the code for that:
socket.addEventListener("message", function(e) {

});
The event that’s passed to the message event has a data property which contains the sent message. So just to see if it’s working, we’ll console log e.data.
socket.addEventListener("message", function(e) {
	console.log(e.data);
});
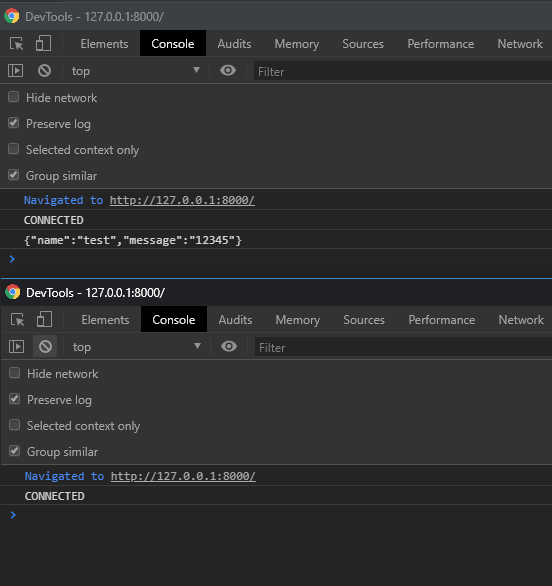
Next, open two windows with your site and view the console of each. Then in one of the windows, type a name and message and press the send button.
Bam! If all works correctly, you should see the serialized object show up in the other browser window’s console!
Next let’s just put some finishing touches on our chat app! We’ll add the name and message to the chat div whenever we receive or send a message.
Since that’s mainly javascript that’s unrelated to websockets, I’ll just give you the code below. However, it’s completely ok to do this on your own. The main thing that you’ll want to do is take the e.data from the message listener, run it through JSON.parse to convert it back to an object and then add the name and message to the div with an id of “chat”.
Here’s my code:
<script type="text/javascript">
    const socket = new WebSocket("ws://localhost:3001");

    socket.addEventListener("open", function() {
        console.log("CONNECTED");
    });

    function addMessage(name, message) {
        const messageHTML = "<div class='message'><strong>" + name + ":</strong> " + message + "</div>";
        document.getElementById("chat").innerHTML += messageHTML
    }

    socket.addEventListener("message", function(e) {
        console.log(e.data);
        try
        {
            const message = JSON.parse(e.data);
            addMessage(message.name, message.message);
        }
        catch(e)
        {
            // Catch any errors
        }
    });


    document.getElementById("sendBtn").addEventListener("click", function() {

        const message = {
            name: document.getElementById("name").value,
            message: document.getElementById("message").value
        };
        socket.send(JSON.stringify(message));
        addMessage(message.name, message.message);
    });
</script>
I added an addMessage function that adds the name and message to the chat div. Then when someone clicks the send button it will add the message to the chat div after sending to the websocket server. In the message event listener, I’m also adding any messages that are received to the chat div.
The one thing to note that I did not cover in this is that you should be careful when adding potentially risky html to a page. In a real world case you would want to sanitize the name and message either on the server before sending to the other connections or in the javascript code before adding it to the page.
Great! The chat should now be fully working. If you open the windows side by side and submit a name and message you should see it show up in both windows!

Hopefully this tutorial was helpful in getting you started with Websockets in Symfony 5! I have to give a lot of credit to the RatchetPHP documentation. The example there goes over how to set up websockets without Symfony and I mainly used their example in creating this tutorial.
Here’s a link to a repo I setup with the code so you can compare to your own if you’re having any trouble: https://github.com/leorojas22/symfony-websockets
If you have any questions feel free to leave a comment below!