Vue.js is a javascript framework similar to Angular and React. It provides the tools for you to build dynamic single page applications as well as one off javascript widgets.
In this tutorial you will learn the basics of Vue.js and will hopefully get to a point where you are comfortable enough to move to more advanced topics.
Prerequisites & Installing Vue.js
Before you can start creating a Vue.js app, you’ll need to have node installed. If you don’t, go to https://nodejs.org and follow the instructions there. If you’re on Windows, there is an installer that will handle setting everything up for you.
Once node is installed, open a terminal and type the following:
npm install -g @vue/cli
This will install a command line helper that we’ll use to create the starting boilerplate for our Vue application. Once it’s finished installing, we can move on to creating your first app.
It is also recommended that you are comfortable with javascript, html and css before going through this tutorial.
Creating your first Vue.js app
To start making our Vue.js application, type the following into your terminal:
vue create hangman
A prompt similar to the one below will come up asking you to pick a preset. Press enter to choose the default and the project will start to get created.
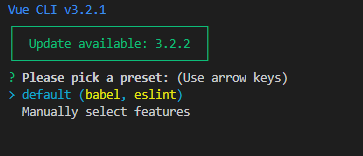
This will create a directory called hangman and setup a base project that we can use to build our app from. As you may be able to tell, the “hangman” part of that command is completely up to you. That is essentially the name of the folder that you want to store your project in.
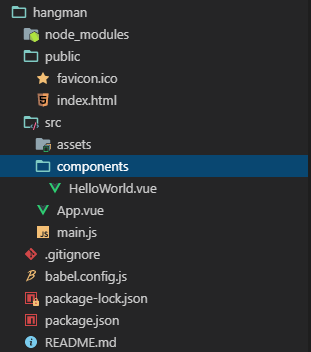
It will probably take a few minutes for everything to install, but once it’s finished your project directory should look something like this:
Also, if you notice in the terminal it will say:
Get started with the following commands:
cd hangman
npm run serve
Run those commands and it will show you a url you can use to preview your app. Copy the url and paste it in to your browser to see. Any changes you make to your project files will automatically be reflected at this url.
So, let’s start by explaining some of these files. Open the main.js file. The only important thing you need to understand right now is how it’s determining what to render. As you get more comfortable with Vue, you will be modifying this file but for now you can leave it as is.
The bit of code that does the actual rendering is this:
new Vue({
 render: h => h(App),
}).$mount('#app')
This creates the Vue instance and renders it on the page. It uses the App.vue file as it’s main component. You can see that from the render: h => h(App) line, which refers to the App variable created by the import App from ‘./App.vue’ line.
The main thing I want you to take away from that is, is that you don’t necessarily need to call your main component App.vue, that’s just how the base project is configured. We can rename App.vue to Hangman.vue and then update:
import App from './App.vue'
to
import App from './Hangman.vue'
and it will work the same.
Ok, let’s move on to our App.vue file.
You’ll notice there are 3 sections in this file: template, script and style. These are the 3 sections that make up a single file component. With Vue, you don’t necessarily need to use this format. You can create a Vue app using just the Vue object we saw in the main.js file, but generally, when building real world applications, you will be using single file components.
The template section, holds, well, your template. This can have standard HTML or custom Vue elements. As you can probably see from the base project, this template section has a HelloWorld element that is definitely not standard HTML.
The script section holds your javascript. It must export a default object (I’ll refer to it going forward as our “Vue object”) similar to the one set up by the base project. We will go into that more once we start working on our app.
Lastly, the style section holds any of your css.
You don’t necessarily need to have all 3 of these sections. You can just have a template section and it will work fine.
Preparing our base project
Ok, with those important parts of Vue explained, let’s move on to preparing our project. Delete everything within the template, script and style sections in your App.vue file and also delete the HelloWorld.vue file in the components folder.
Next, just so we have some slightly nicer styles, we’re going to add bootstrap to our project. To do that, open the public/index.html file. This is the html file that is actually loaded when you view your Vue app in the browser. In between the head tags, add this bit of code:
<link rel="stylesheet" href="https://stackpath.bootstrapcdn.com/bootstrap/4.1.3/css/bootstrap.min.css" integrity="sha384-MCw98/SFnGE8fJT3GXwEOngsV7Zt27NXFoaoApmYm81iuXoPkFOJwJ8ERdknLPMO" crossorigin="anonymous">
And that’s just standard HTML, we’re including the bootstrap css file so we can use the classes in our app.
Next, open up App.vue again and we’re going to put a container div as the base element in the template file like so:
<template>
   <div class="container">

   </div>
</template>
In the script tag add the following:
<script>
   export default {

   }
</script>
And then add some padding to the body in the style section:
<style>
   body {
       padding: 20px;
   }
</style>
With that let’s move on to building out our app components!
Components
We’re going to start with discussing how we can show dynamic content inside the template section. To do that, in the object we’re exporting in the script section we need to add a data function which returns an object. This object will hold any variables that we want to use in our template section.
So for example, create the data function and then have it return an object with a property called name, the the value of your name. Here is my code if you need help:
export default {
   data() {
	   return {
		   name: "Leo"
	   }
   }
}
Then in the template section, between the container div put the following:
My name is {{ name }}
And hit save. Your app’s web page should show something like “My name is Leo”. Any property you set in the data function will be accessible using double curly braces in your template section.
Now that we know about data, let’s clear that out that test code and work on our game!
Since we’re making hangman, let’s think about the types of variables we’re going to need. We’ll need to have a word bank of a bunch of words that we can use. We’ll need to know what word the person is guessing and we should also keep track of any letters that the player has guessed.
So, let’s create those in our data function. For the wordBank, we want that as an array of words. wordPicked will start off as an empty string and the lettersGuessed will start off as an empty array. You can pick any words you’d like for the word bank. Here’s my code with the words I chose. Feel free to use those or use your own!
export default {
   data() {
	   return {
		   wordBank: [
			   'movie theater',
			   'baseball',
			   'gnome',
			   'thunder storm',
			   'new york',
			   'california',
			   'airplane',
			   'circus',
			   'water bottle',
			   'Happy New Year!'
		   ],
		   wordPicked: "",
		   lettersGuessed: []
	   }
   }
}
Next, let’s work on creating the actual hang man on the hanging post. For this we’re going to make a new component. Inside the components directory create a file called HangPost.vue and setup your 3 sections: template, script and style.
For the style section, I’ve prepared some css classes that you can use to display a hangman on the post. Copy the following bit of css into your style section:
.hang-post {
	position: relative;
	border-top: solid black 2px;
	border-left: solid black 2px;
	width: 100px;
	height: 300px;
}

.hang-post::before {
	position: absolute;
	content: "";
	width: 2px;
	background-color: black;
	height: 30px;
	top: 0px;
	left: 96px;
}

.hang-post::after {
	position: absolute;
	content: "";
	height: 2px;
	width: 80px;
	bottom: 0px;
	background-color: black;
	left: -40px;
}

.head {
	position: absolute;
	width: 50px;
	height: 50px;
	border: solid red 2px;
	border-radius: 50px;
	top: 30px;
	left: 73px;
}

.body {
	position: absolute;
	width: 2px;
	height: 100px;
	background-color: red;
	left: 96px;
	top: 80px;
}

.left-arm {
	position: absolute;
	width: 2px;
	height: 40px;
	background-color: red;
	transform: rotate(-60deg);
	top: 85px;
	left: 78px;
}

.right-arm {
	position: absolute;
	width: 2px;
	height: 40px;
	background-color: red;
	transform: rotate(60deg);
	top: 85px;
	left: 114px;
}

.left-leg {
	position: absolute;
	width: 2px;
	height: 60px;
	background-color: red;
	transform: rotate(35deg);
	top: 174px;
	left: 78px;
}

.right-leg {
	position: absolute;
	width: 2px;
	height: 60px;
	background-color: red;
	transform: rotate(-35deg);
	top: 174px;
	left: 114px;
}
Then in your template section put the following bit of HTML:
<div class="hang-post">
   <div class="head"></div>
   <div class="body"></div>
   <div class="left-arm"></div>
   <div class="right-arm"></div>
   <div class="left-leg"></div>
   <div class="right-leg"></div>
</div>
Since those two parts are standard html and css, we don’t really need to go over them much. Just know there’s a base hang-post class that has the hanging post and then a separate class for each of the body parts.
Next let’s add this component to our main App.vue file. To do that we need to import the HangPost.vue file by adding the following bit of code just after the script tag:
import HangPost from './components/HangPost.vue';
Then add a new “components” section to your exported object. It can be either above or below the data function. I generally like to put this part towards the top so I know which components I’m using, but it’s completely up to you which order this goes in your object.
The components section should hold an object with the property names of the object being the element name we want to use in our template and the value being the actual component. So for example, if we wanted to use <HangManPost></HangManPost> to display the component in our template, we’d have the components object be:
components: {
   HangManPost: HangPost
}
However, it’s generally good practice to prefix your element names with “app” and then the name of the component, to prevent any collisions with actual html elements or any external Vue libraries that you may use. So let’s change the element name to appHangPost. Here is what that part of your script section should look like now:
<script>
   import HangPost from './components/HangPost.vue';

   export default {
       components: {
           appHangPost: HangPost
       },
       data() {
Next in our template section we can add an appHangPost element. But before we do, there is one other thing you should know. With Vue, even though we called our element appHangPost, we can refer to it in our template as either <appHangPost /> or <app-hang-post />. Generally, the lowercase dashed version is used in practice, so we will be using that format in our templates.
So after adding the component to your template, your code should look like the following:
<template>
   <div class="container">
       <app-hang-post></app-hang-post>
   </div>
</template>

<script>
   import HangPost from './components/HangPost.vue';

   export default {
       components: {
           appHangPost: HangPost
       },
       data() {
           return {
               wordBank: [
                   'movie theater',
                   'baseball',
                   'gnome',
                   'thunder storm',
                   'new york',
                   'california',
                   'airplane',
                   'circus',
                   'water bottle',
                   'Happy New Year!'
               ],
               wordPicked: "",
               lettersGuessed: []
           }
       }
   }
</script>

<style>
   body {
       padding: 20px;
   }
</style>
And your app’s web page should look something like this:
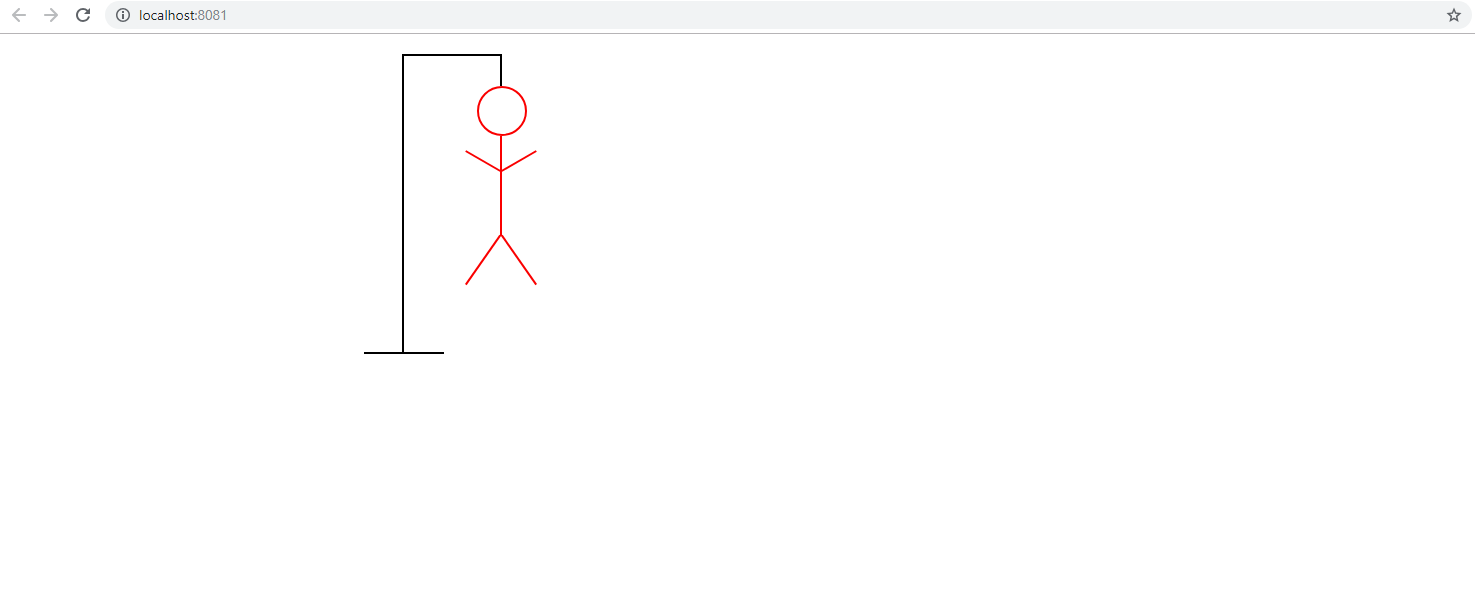
Great! We have our hangman. Now let’s make it so only portions of the body show based on the amount of incorrect answers.
Conditionals & Props
Wouldn’t it be cool if we could tell the HangPost component the amount of incorrect answers and based on that number, show certain parts of the hangman? Well we can, with props! Props are essentially a way of letting you add attributes to your component elements inside a template and then being able to read those attributes inside the component.
So for example, say we add an attribute to the <app-hang-post> element in our template called wrongAnswers and set it equal to 3. We can then use the wrongAnswers attribute inside the HangPost.vue component and determine how many parts of the body to show. Let’s add that attribute now and then we’ll update the HangPost.vue to be able to read it. Here’s your template code for App.vue after making that adjustment:
<template>
   <div class="container">
       <app-hang-post wrongAnswers="3"></app-hang-post>
   </div>
</template>
Next open the HangPost.vue file. Add a script section and have it export a default empty object.
Inside the object add a property called ‘props’ and set it to an array. In the array add an element called wrongAnswers. Here’s what that looks like:
<script>
export default {
   props: [
       'wrongAnswers'
   ]
}
</script>
With that, our component now knows to expect a wrongAnswers attribute when it’s used inside a template. We can now access the wrongAnswers value just like we can with a data property. By surrounding it in curly braces in the template section. Let’s try that out real quick. In your template section add this after the right-leg div:
{{ wrongAnswers }}
After saving, you should see the 3 that we set inside our App.vue file towards the top left of the hanging post. Now let’s use the wrongAnswers value to hide or show parts of the body. So delete the {{ wrongAnswers }} from the template and then we’ll continue.
In Vue there is a special attribute that you can add to elements that let you do a condition check. It’s called v-if. The value of v-if should be an expression that equates to true or false. So, let’s add v-if attributes to each of the body parts in our template.
For the head, we only want to show this if the number of wrong answers is greater than 0. So for that we’d do:
<div class="head" v-if="wrongAnswers > 0"></div>
For the body, we only want to show that if the number of wrong answers is greater than 1. Our code would look like:
<div class="body" v-if="wrongAnswers > 1"></div>
And so on. Continue the same pattern for each of the body parts on your own. When your done take a look at my code:
<template>
   <div class="hang-post">
       <div class="head" v-if="wrongAnswers > 0"></div>
       <div class="body" v-if="wrongAnswers > 1"></div>
       <div class="left-arm" v-if="wrongAnswers > 2"></div>
       <div class="right-arm" v-if="wrongAnswers > 3"></div>
       <div class="left-leg" v-if="wrongAnswers > 4"></div>
       <div class="right-leg" v-if="wrongAnswers > 5"></div>
   </div>
</template>
For each of the body parts, we’re checking if wrong answers is greater than a certain number. So essentially after someone has 6 incorrect guesses, the entire hangman will appear. If you check your app’s web page, you should see just the head, body and left arm like so:

Go back to your App.vue file and adjust the wrongAnswers attribute to be a bunch of different numbers and it should hide/show the different parts of the body based on the number you put.
Great! With that, hopefully you have a little better understanding of how to use props. They are mainly used to pass data from parent components down to child components like we did here. The HangPost component doesn’t necessarily need to know everything that the App component knows. It just needs to display a hangman based on the number of wrong answers.
Handling Form Input
Next we’re going to work on creating the form where the player can guess a letter. Before we do let’s do some styling and formatting of our page. This, again is standard html and bootstrap stuff, which isn’t what this tutorial is about so I’m going to give you the code and I’ll explain it after.
<template>
   <div class="container">
       <div class="row">
           <div class="col-3">
               <app-hang-post wrongAnswers="3"></app-hang-post>
           </div>
       </div>
       <div class="row">
           <div class="col-2 offset-2">
               <!-- Guess letter form goes here -->

           </div>
       </div>
   </div>
</template>
Nothing new Vue-wise. Here I’ve just added some bootstrap classes to format our page a little better and I’ve added a comment where we’ll add the guess a letter form.
So with that, let’s move on to creating the form. To create a form, it’s also going to be the same way you’d make a form in regular html. Create a form element, inside the form, add an input field for the letter and then add a button to submit the form. Try writing that out on your own and if you know bootstrap use their helper classes to format your form. Here’s my code for creating the form:
<form>
   <div class="form-group">
	   <input type="text" maxlength="1" class="form-control" placeholder="Enter Letter">
   </div>
   <div class="form-group">
	   <button class="btn btn-primary">
		   Guess!
	   </button>
   </div>
</form>
Again, this should be pretty familiar to you. The only thing you may not be familiar with are the bootstrap classes. Everything else is standard html and css.
Now, to connect your form fields to Vue, we use another special Vue element attribute called v-model. You set the value of v-model to one of your data fields. So, let’s add a new data field called guessedLetter and set it equal to an empty string. After adding it, your data function should look similar to this:
data() {
   return {
	   wordBank: [
		   'movie theater',
		   'baseball',
		   'gnome',
		   'thunder storm',
		   'new york',
		   'california',
		   'airplane',
		   'circus',
		   'water bottle',
		   'Happy New Year!'
	   ],
	   wordPicked: "",
	   lettersGuessed: [],
	   guessedLetter: ""
   }
}
Then, on the input field we added in our form, add an attribute called v-model and set it equal to guessedLetter. And that’s it! We’ve connected our input field to a data attribute that we can control. Let’s see it in action! If you add this bit of code just under your input field:
{{ guessedLetter }}
Then save your file and go to your app’s web page. Typing something into the input field should show the same value just underneath the input field.
Amazing! Now let’s actually do something with that guessedLetter value. Remove that {{ guessedLetter }} bit of code and we’ll move on.
Methods
Similar to the data and components section of the Vue object we’re building, there is another section we can add called methods. This will hold any functions that we want to use throughout our app. One function that we’re going to want is something that reacts to the player clicking the guess button in our form. So, lets create the methods section in our Vue object and add a function called guess. Inside the function just to test that it’s working add this bit of code:
alert("IT WORKS!");
Next, in order to trigger this function to be called when the user clicks on the guess button, we add a v-on:click attribute to the button. Now this one will likely look weird to you. It did to me at least in the beginning. But there is a shorthand way of writing this which also looks weird in the beginning, but you do eventually get used to it. To write it shorthand is @click. Essentially, the click part is the event we are looking for. This can be any javascript event. So we can also do something similar with @input, @focus, @blur, etc.
On the button element add the @click attribute and set it equal to guess. Save and then go test it out on your page. Clicking the button should show an alert pop up. But also, when you click the ok button on the alert, the page reloads. That’s because the form is being submitted. We don’t want that. To prevent this, we can add a parameter to our guess method. When a method is called from a user interaction inside a template, a regular javascript event object is passed to the method. To prevent the form from submitting you would call the preventDefault method on the event object passed to your guess method. See if you can make that adjustment to your guess method on your own, and if you need help take a look at my code below:
guess(e) {
   e.preventDefault();
   alert("IT WORKS!");
}
If you save and go back to test it on your page again, it should now stay on the page after the alert is closed.
Now let’s work on actually making this guess method work. One thing we haven’t seen yet is how to interact with our data fields outside of the template. To access them is actually pretty easy. They can be accessed like they are properties of a class. So for example, to access the guessedLetter field, you would type:
this.guessedLetter
The same goes for the other data fields, any other methods you might have and also any props you may have.
Now that we know that, we can build out this guess method. Let’s think about what this needs to do. Essentially what this method needs to do is add the letter to the list of guessed letters and check if the player has won or lost. We also want to prevent the player from guessing the same letter twice and restrict the guesses to only letters and numbers.
Let’s first convert the letter to lowercase so we don’t need to check both cases throughout our app. Then we should check if the letter has already been guessed. To do that we check if the letter is already in our lettersGuessed array. If it has already been guessed, show an error message.
Then we can check if the letter is an actual letter or number. If it fails, show an error message. If it passes, we add it to the lettersGuessed array and clear out the guessedLetter value. Then we check if the player has won or lost based on the letters guessed. See if you can write that code out up to the point where you need to check for the win/loss condition. I want you to leave that part out for now as I’m going to show you another feature of Vue that we can use for that.
Here’s how I did it:
guess(e) {
   e.preventDefault();

   let lowercaseLetter = this.guessedLetter.toLowerCase();

   if(this.lettersGuessed.indexOf(lowercaseLetter) !== -1)
   {
	   // Letter already guessed!
	   alert("That letter has already been guessed!");
   }
   else if(!lowercaseLetter.match(/[a-z0-9]/g))
   {
	   // Value entered is not a letter or number
	   alert("You may only enter letters or numbers!");
   }
   else
   {
	   // If it makes it here, the letter is valid
	   this.lettersGuessed.push(lowercaseLetter);
   }

   this.guessedLetter = "";
}
The above should be somewhat familiar if you’ve worked with javascript before. It’s all normal javascript nothing too specific to Vue.
If you open your app’s page and try submitting the form with the same letter twice you should see the “That letter has already been guessed!” message come up. The same goes for the “You may only enter letters or numbers” message if you try to enter a non-letter or non-number. Great, now let’s work on those win/loss conditions.
Computed Properties
The first check we’ll work on is the loss condition. What we need to do is count up the number of wrong answers the player entered. For this, we’re going to use another feature of Vue called computed properties. Computed properties work similar to how data properties work, in that you can use the double curly braces to access them from the template and you can call them like they are property of the class inside a method with this.
Each computed property is a method inside the computed section of your Vue object. So let’s get started on a wrongAnswers one now.
To start, add a computed section to your Vue object and then add an empty function called wrongAnswers. For now have it return the number 2. Here’s the code for that if you’re unsure:
computed: {
   wrongAnswers() {
	   return 2;
   }
}
We’re going to test it out now by passing the wrongAnswers value to our app-hang-post element. When passing dynamic data down, as in data, props or computed properties we can’t just set the value equal to the property name. Vue doesn’t know to not treat that value like a string. In order for Vue to know that this is a variable we’re passing to the attribute and not a string we attach v-bind: to the attribute name.
So for example, to change the wrongAnswers attribute to be binded to our wrongAnswers computed property you would write:
<app-hang-post v-bind:wrongAnswers="wrongAnswers"></app-hang-post>
You can however, write this shorthanded without the v-bind part and just the colon like so:
<app-hang-post :wrongAnswers="wrongAnswers"></app-hang-post>
Since it’s generally written shorthanded, that’s how I’ll use it going forward. But now if you update your app with the code above, you should see just the head and body of the hanging man. And that’s because we’re returning 2 from our wrongAnswers computed property. Let’s get back to building out this property now.
For this wrongAnswers property, we essentially want to count the number of wrong letters inside the lettersGuessed array. Then we want to return that number. Try writing that code out on your own and if you need help, take a peek at my code:
wrongAnswers() {

   let wrongAnswers = 0;

   // Count the number of incorrect letters in the letters guessed array
   let lowercaseWord = this.wordPicked.toLowerCase();
   let lettersGuessedTotal = this.lettersGuessed.length;
   for(let x = 0; x < lettersGuessedTotal; x++)
   {
	   let letter = this.lettersGuessed[x];
	   if(lowercaseWord.indexOf(letter) === -1)
	   {
		   // Letter not in the word
		   wrongAnswers++;
	   }
   }

   return wrongAnswers;
}
Here I’m lowercasing the workPicked so I only need to check one of the cases. Remember, we’re lowercasing the letter before adding it to our lettersGuessed array in the guess method so we don’t need to worry about the case of letters in that array.
Then I’m looping through each of the guessed letters and checking if they are in the word that was picked. Lastly, I’m returning the number of wrong answers.
Let’s test this quick. Currently our wordPicked is blank. So any letter we type in and guess should reveal an additional part of the hangman’s body. Try it out.
Now let’s test it with a word in the wordPicked property. Set your wordPicked property equal to any word you want and then save. Then try guessing letters again. This time mix in letters that you know are in the wordPicked. The correct guesses should not reveal a new body part.
When you’ve made sure it’s all working, set your wordPicked back to an empty string and we’ll move on to the win condition.
For the win condition we need to check if the player has guessed all the letters in the word. One way to check for that would be to loop through each character in wordPicked, check if the character is a letter or number and if it’s in the lettersGuessed array. If those conditions combined equate to false, we know the player hasn’t won yet.
Try writing out this computed property on your own. It doesn’t need to follow the exact logic I wrote above. As long as it returns whether or not the player guessed all the letters in the word, it works.
Here’s how I did it:
playerWon() {

   // Check if the player won
   let lowercaseWord = this.wordPicked.toLowerCase();
   let wordLength = lowercaseWord.length;
   let playerWon = true;
   for(let x = 0; x < wordLength; x++)
   {
	   let letter = lowercaseWord[x];
	   if(letter.match(/[a-z0-9]/g) && this.lettersGuessed.indexOf(letter) === -1)
	   {
		   // Hasn't guessed this letter yet, player has not won
		   playerWon = false;
		   break;
	   }
   }

   return playerWon;
}
Just to explain my logic a little further, I’m starting off assuming the player has won. Then I’m going through each character in wordPicked and checking if the character is a letter or number. If it is, I’m checking if the letter has been guessed. If it hasn’t, then the player hasn’t won yet and I break out the loop and set playerWon to false. Then I’m returning whether or not the player won at the end of the function. I’m ignoring any non-letter or number characters because normally you wouldn’t be guessing symbols in hangman, they’re just given to you.
Now that we have our win/loss conditions built out, let’s add them into our guess method.
After we add the guessed letter to the lettersGuessed array. Check to see if this.wrongAnswers is greater than 5. If it is, the player has lost. We should show a message saying they lost and ask if they want to play again.
We can also check if the player won by checking if this.playerWon is equal to true. If they did win, we’ll show a message and ask them if they want to play again.
Try writing those checks with the messages out on your own. When your done, take a look at how I did it below. Then we’ll work on actually letting the player restart the game.
if(this.wrongAnswers > 5)
{
   // Player Loses
   if(confirm("You lost!  The word was "+this.wordPicked+". Do you want to play again?"))
   {
	   // todo: Restart game

   }
}


if(this.playerWon)
{
   // Player won
   if(confirm("You won! Do you want to play again?"))
   {
	   // todo: Restart game

   }
}
Here I’m checking if the player either won or lost. If they lost I’m also letting them know what the word is so they aren’t stuck forever guessing ![]() Then, using a confirm dialog I’m checking if they respond yes or no to the “Do you want to play again?” message. One thing you might have noticed is that this.wrongAnswers and this.playerWon are being called like they are normal properties (and not methods) on our object. That’s because Vue converts them to actual properties behind the scenes so you can treat them as such in your code.
Then, using a confirm dialog I’m checking if they respond yes or no to the “Do you want to play again?” message. One thing you might have noticed is that this.wrongAnswers and this.playerWon are being called like they are normal properties (and not methods) on our object. That’s because Vue converts them to actual properties behind the scenes so you can treat them as such in your code.
Now let’s work on letting the player restart the game. To do that, we’re going to add another method called startNewGame. In this function we need to pull a random word from our wordBank array and we need to set lettersGuessed equal to an empty array. If you can, try writing that on your own. Here’s my code if you need help:
startNewGame() {
   // Get a random number from 0 to the number of words in our word bank
   let totalWords = this.wordBank.length;
   let randomNumber = Math.floor(Math.random() * totalWords);

   // Clear out letters guessed
   this.lettersGuessed = [];

   // Set the word picked to a random word
   this.wordPicked = this.wordBank[randomNumber];

}
The main complicated part, if you aren’t used to doing it, is probably getting a random number. Math.random(), if you don’t know returns a value between 0 and 1. What we need is a random number from 0 to the number of keys in our wordBank. So to do that, you multiply the number of words in wordBank by Math.random(). Then, to make it a whole number we get the floor of that so any decimal is rounded down.
Then we use that random number to set wordPicked and we empty out the lettersGuessed array.
Now let’s use this startNewGame method in our guess method to restart our game. Under each of the todo: Restart game comments add: this.startGame().
Here’s what our final guess method looks like:
guess(e) {
	e.preventDefault();

	let lowercaseLetter = this.guessedLetter.toLowerCase();

	if(this.lettersGuessed.indexOf(lowercaseLetter) !== -1)
	{
		// Letter already guessed!
		alert("That letter has already been guessed!");
	}
	else if(!lowercaseLetter.match(/[a-z0-9]/g))
	{
		// Value entered is not a letter or number
		alert("You may only enter letters or numbers!");
	}
	else
	{
		// If it makes it here, the letter is valid
		this.lettersGuessed.push(lowercaseLetter);

		if(this.wrongAnswers > 5)
		{
			// Player Loses
			if(confirm("You lost!  The word was "+this.wordPicked+". Do you want to play again?"))
			{
				// Restart game
				this.startNewGame();
			}
		}


		if(this.playerWon)
		{
			// Player won
			if(confirm("You won! Do you want to play again?"))
			{
				// Restart game
				this.startNewGame();
			}
		}
	}

	this.guessedLetter = "";
}
With a startNewGame method, we can now also add a button that lets the player start a new game if there is no word picked or if the player won.
To do this we need to modify our template a little. In our guess letter form, let’s add a v-if attribute that only shows our guess letter form if the player hasn’t won yet and a letter has been picked. See if you can write that bit of code on your own or take a look at my code below if you need help:
<form v-if="!playerWon && wordPicked">
   <div class="form-group">
	   <input type="text" maxlength="1" class="form-control" placeholder="Enter Letter" v-model="guessedLetter">
   </div>
   <div class="form-group">
	   <button class="btn btn-primary" @click="guess">
		   Guess!
	   </button>
   </div>
</form>
If you save and go to your app’s web page, you should only see the hanging post with no form and no body parts. Now, let’s show a button to let the player start a new game if the player has won or if no word has been picked. To do that, we can do another v-if or we can use another Vue attribute called v-else. v-else works similar to the else part of an if statement. If the condition in a v-if statement is false and there is an element directly underneath with a v-else, Vue will render that element. If the v-if returns true, the v-else will not be rendered. Here’s an example just so it’s a little more clear:
<div v-if="false">Hide me</div>
<div v-else>Show me</div>
Let’s use v-else to show another form with a New Game button when the player has either won or no word has been picked. Try writing this out on your own and then take a look at my code below:
<form v-else>
   <div class="form-group">
	   <button class="btn btn-info" type="button" @click="startNewGame">
		   New Game
	   </button>
   </div>
</form>
Nothing too new in the code above. We’re using the v-else to show the new game form when the guess letter form isn’t shown. I’m also using some bootstrap classes to style the button and form.
Go back to your app’s web page to see if it’s working. To start, you should see just the hanging post and a New Game button. When you hit New Game, it should show the guess letter form because our startNewGame method was called and picked a word for us.
Now, the final thing we’re missing is actually displaying some kind of indication of how many letters are in the word, which one’s we’ve guessed correctly and which one’s we guessed incorrectly. Let’s work on that now.
First we’ll work on displaying the word picked in a way where the player knows how many letters there are and which letters they’ve guessed correctly. So for example if the word was “Hello World” and L and O were guessed it would look something like this:
_ _ L L O _ O _ L _!
(Yes, I see that says LLOOOL! ![]() )
)
To keep things a little more separated, I’ve decided to make this into a new component. So in the components folder, create a new file called Word.vue. Setup the 3 sections: template, script and style.
We’ll work on the script section first. Set it up to export a default empty object. Inside the object we’re going to add some props. This component is going to need to know the word that’s being guessed and the letters that have been guessed. So add two props, one called word and one called lettersGuessed. Try writing that code out on your own and if you need help, take a look at my code below:
<script>
export default {
   props: [
       'word',
       'lettersGuessed'
   ]
}
</script>
Next we’re going to write a computed property that figures out whether to display an underscore (for a letter that hasn’t been guessed yet) or the actual character in the word if it has been guessed or it’s a character other than a letter or number. This one will be a little tricky, but as always see if you can figure out how to write this method on your own.
If you’re done or get stuck, here’s my code:
computed: {
   revealedWord() {
	   let wordLength = this.word.length;
	   let formattedWord = "";
	   for(let x = 0; x < wordLength; x++)
	   {
		   let letter = this.word[x];
		   if(this.lettersGuessed.indexOf(letter.toLowerCase()) !== -1)
		   {
			   formattedWord += letter;
		   }
		   else if(letter.match(/[A-Za-z0-9]/g))
		   {
			   // Letter is not a symbol or space
			   formattedWord += " _ ";
		   }
		   else if(letter === " ")
		   {
			   formattedWord += "    ";
		   }
		   else
		   {
			   formattedWord += letter;
		   }
	   }

	   return formattedWord;
   }
}
Here we’re setting up an empty variable that will hold the formatted string that will contain the underscores for missing letters and the actual letters if its been guessed.
Then we’re looping through each character in the word. If character is in the list of guessed letters, we add it to the formattedWord string as a revealed letter.
If it’s not in the list of guessed letters, we then check if the character is either a letter or number. If it is, we’re adding an underscore with some spacing to the formattedWord.
If the first two checks don’t pass, we check if the character is a space, and a few extra spaces so the player knows when there are multiple words.
Then, if it doesn’t pass any of the previous checks, it’s safe to assume that the character is some kind of symbol that the player doesn’t need to guess so we add it to the formattedWord.
At the end, we’re returning the formattedWord.
With that, we can use this revealedWord computed property in our template. Our template for this component is going to be pretty simple. It will be the revealedWord inside paragraph tags like so:
<template>
   <p>
       {{ revealedWord }}
   </p>
</template>
Lastly, we’re going to style this a little bit. In your style tag, add the following css:
p {
   white-space: pre;
   font-size: 24px;
}
This will just make the revealed word larger and makes the spacing that we added actually appear. Now, one extra thing I want to cover here. Currently, this style on the p tag is global. So any other p tags throughout our app are also going to have this same style. We could add a separate class to prevent this or we can use another feature of Vue. If you add scoped to the style tag like so:
<style scoped>
Any css will only be used on the elements in this component. It will not affect any of the other components in your app. This is helpful when you want to build these small compartmentalized kind of components that have their own styling and you don’t want to bog it down with a bunch of css classes.
So let’s add scoped to our style tag and save.
Now we need to import this component into our main App.vue file and use it. Like we did with the HangPost component, import it at the top of your script section. Then add it to the components section in your Vue object similar to how we set up the HangPost component. See if you can write that out yourself and then take a look at my code below:
<script>
   import HangPost from './components/HangPost.vue';
   import Word from './components/Word.vue';

   export default {
       components: {
           appHangPost: HangPost,
           appWord: Word
       },
Next let’s add it to our template. We’ll add it underneath the col-3 div that holds the <app-hang-post> element. Surround it in a div with the class “col”. Here’s what that portion of your template should look like after adding it:
<div class="row">
   <div class="col-3">
	   <app-hang-post :wrongAnswers="wrongAnswers"></app-hang-post>
   </div>
   <div class="col">
	   <app-word></app-word>
   </div>
</div>
We also need to add the attributes word and lettersGuessed. Similar to how we have the <app-hang-post> element, we need to bind the word and lettersGuessed attributes to the properties in our main App component. After binding them, here’s what your <app-word> element should look like:
<app-word :word="wordPicked" :lettersGuessed="lettersGuessed"></app-word>
After saving, go to your app’s web page and click New Game. It should now look something like this:
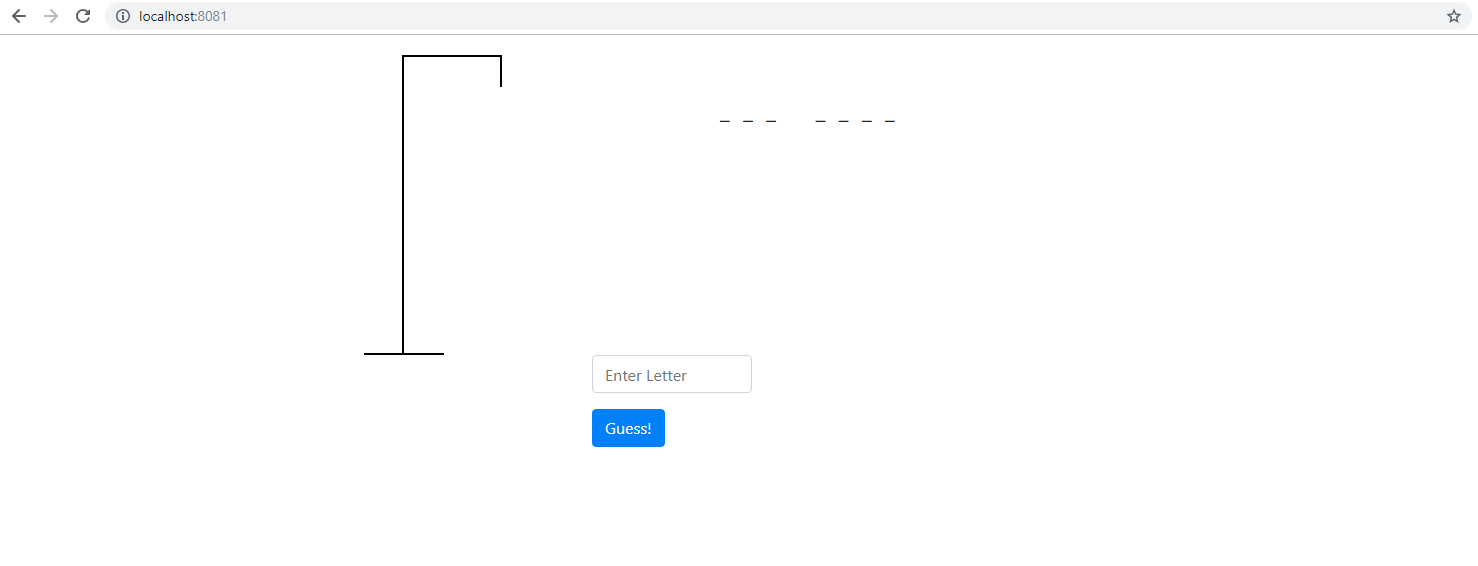
We’re almost there! If you try guessing a letter, it should reveal any correct letters as well!
The final step is to add a list of all the guessed letters. We’ll add it next to the guess letter form. Just underneath the <div class=”col-2 offset-3″> that holds the forms, add another div with the class “col”. Inside there we will add the guessed letters. Before we go over how to display the lettersGuessed array, here’s what I have so far for the guessed letters section of our template:
<div class="col">
   <p><strong>Guessed Letters:</strong></p>
   <p>
	   <!-- Guessed letters go here -->
   </p>
</div>
We’ll put the guessed letters list where the comment is. There’s a bunch of ways we can display the guessed letters, but just so you can see a few more new Vue concepts we’re going to use v-for. As you might guess, it’s Vue’s way of creating a for loop in the template. Also, so far when we’ve used things like v-if we’ve always had it on an actual element, like a form or div. In this case, since we’re displaying separate letters, we could wrap each letter in a span element, but that would be a waste. We don’t really need the span element. We can use the <template> element inside our template to output content that doesn’t need to be wrapped in a tag. Here’s how it would look:
<p>
   <template v-for="letter in lettersGuessed">{{ letter }} </template>
</p>
The v-for is setup similar to a for in loop. In the above v-for we have the expression “letter in lettersGuessed”. We can then use the letter variable while inside this v-for loop. If this were an actual html element we’d be able to add an attribute with the letter in it.
One important thing to note with v-for: If you’re using it on an actual html element or one of your own custom Vue elements, you need to have a key attribute attached. This key must be unique for each element in the loop. Here’s another example using spans for the lettersGuessed:
<p>
   <span v-for="letter in lettersGuessed" :key="letter">{{ letter }} </span>
</p>
Here we’re binding the key attribute to the letter variable. However, in our case you don’t need to use the span example in your code, the template example will work fine. But there will be cases where you’ll want to loop through with an actual element and in those cases know that you will need a key attribute.
This is what my final template code looks like:
<template>
   <div class="container">
       <div class="row">
           <div class="col-3">
               <app-hang-post :wrongAnswers="wrongAnswers"></app-hang-post>
           </div>
           <div class="col">
               <app-word :word="wordPicked" :lettersGuessed="lettersGuessed"></app-word>
           </div>
       </div>
       <div class="row">
           <div class="col-2 offset-2">
               <!-- Guess letter form goes here -->
               <form v-if="!playerWon && wordPicked">
                   <div class="form-group">
                       <input type="text" maxlength="1" class="form-control" placeholder="Enter Letter" v-model="guessedLetter">
                   </div>
                   <div class="form-group">
                       <button class="btn btn-primary" @click="guess">
                           Guess!
                       </button>
                   </div>
               </form>
               <form v-else>
                   <div class="form-group">
                       <button class="btn btn-info" type="button" @click="startNewGame">
                           New Game
                       </button>
                   </div>
               </form>
           </div>
           <div class="col">
               <p><strong>Guessed Letters:</strong></p>
               <p>
                   <template v-for="letter in lettersGuessed">{{ letter }} </template>
               </p>
           </div>
       </div>
   </div>
</template>
Conclusion
We’re done! Our little hangman game is complete. If you want to look at the final bit of code, here is the github repo with everything in it: https://github.com/leorojas22/vuejs-hangman.
Hopefully you were able to learn a little about Vue.js as you went through this tutorial and gained enough knowledge to start looking at more advanced concepts. If you have any questions, feel free to leave a comment below!