If you’re not sure how to use the Braintree Javascript SDK with Vue.js, then you’ve come to the right place! Today we’ll be creating a payment form using Vue.js to accept payments from Braintree and PayPal.
If you didn’t know, Braintree is a payment gateway owned by PayPal that allows you to accept payments online. They offer a bunch of different ways for you to accept money. The main ones being credit card and PayPal. If you want to see what else they offer, click here.
Braintree actually does have pretty good documentation on how to use their library to accept payments, however if you’re newer to Vue.js and javascript frameworks in general, it’s not always clear how to use them with a framework. The examples on their site are mainly done with vanilla javascript. Hopefully with this tutorial you’ll be able to see how to do it with Vue!
If you just want to see how it’s done without going through the whole tutorial, checkout this repo on GitHub. You may be able to get an idea of how to use it by just looking at the App.vue file.
What we’re making
We’ll be creating a form (example) that allows a user to enter an amount and then either their credit card information or PayPal. From their we’ll generate a nonce (an authorization code) that we can send to a backend service that will actually process the payment. For this tutorial, we will be solely focusing on the frontend so there won’t be any actual payments being created, just the authorization code that would be used to create the payment from the backend.
Prerequisites
- You should have vue-cli installed
- You should know the basics of Vue.js
Project Setup
Open a terminal and navigate to where you want to store your project. Then using vue-cli we’ll create one. Type in the following command to do so:
vue create paymentform
When it prompts for a preset, press enter to use the default.
It usually takes some time for this process to run so if you haven’t already, now would be a good time to set up your Braintree and PayPal sandbox accounts. If you already have them, you can skip the next section.
Setting up a Braintree and PayPal Sandbox Account
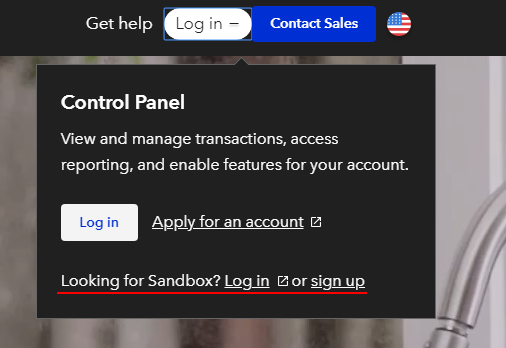
We’ll first create our Braintree account. To do that go to https://www.braintreepayments.com. In the top right you should see a Login button. Click that and then at the bottom you’ll see “Looking for Sandbox?”. Choose the sign up option.
From there it’s just filling out the sign up form and then activating your account after they send you an email.
Next you’ll need to create a PayPal account. This time you’ll make a real PayPal account. So go to https://www.paypal.com and sign up there. When you’re done, or already have one, you’ll need to go to https://developer.paypal.com and go to your dashboard. You’ll want to scroll down to the Rest API apps section:
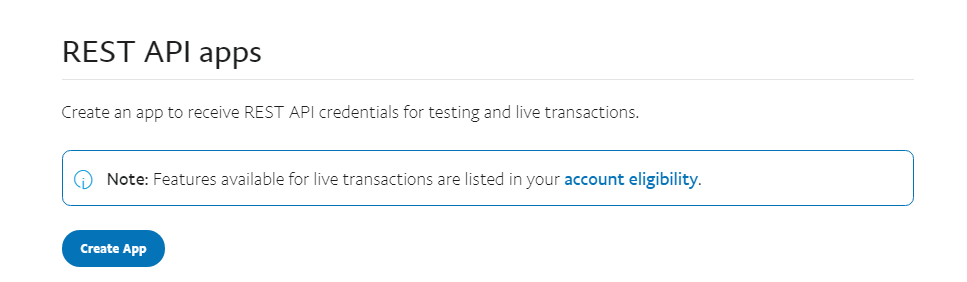
Click on the Create App button. Then type an App name and click the create button. You should now be on a page that has your Client ID and secret like the one shown below:
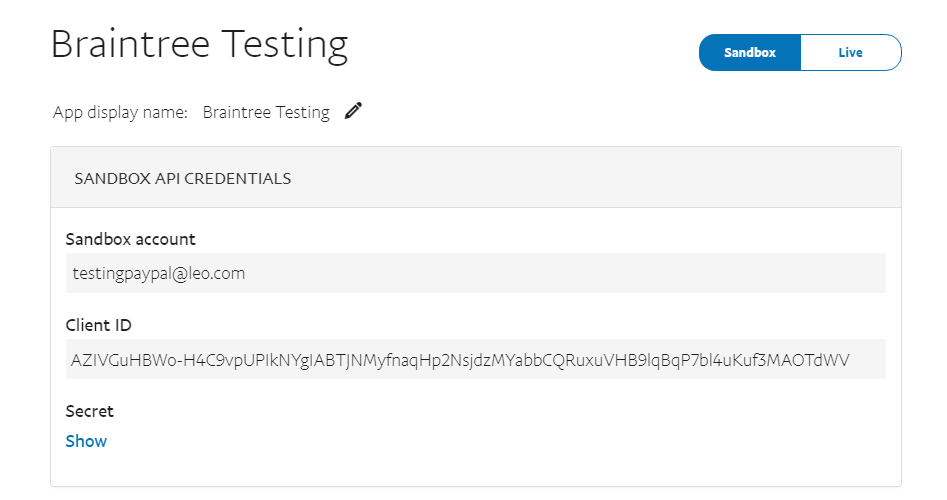
We’ll need this information to connect our PayPal account to our Braintree account. So keep this tab open and in a new tab open up your Braintree dashboard.
In the top menu, hover over Settings and then choose Processing. Then in the PayPal section click Link Sandbox:
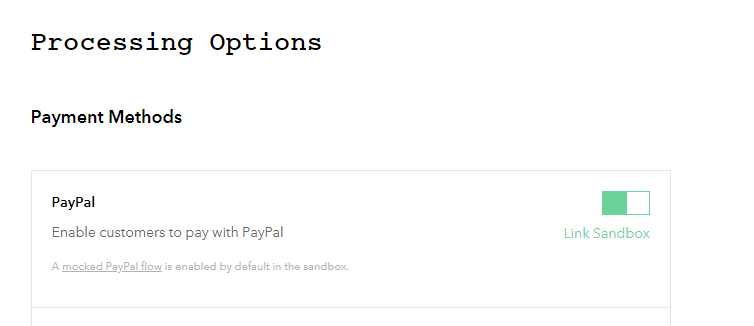
Then enter your PayPal email, the Client ID and Secret in the two text boxes on the next page.
The last thing we’ll need is a PayPal sandbox account. So go back to your PayPal tab and in the left menu should be a Sandbox section with one of the options being Accounts. Click that and then on the next page click the Create Account button. From there, fill out the form to create a sandbox account. We’re going to use this as the account that will make a purchase in our app.
With that, our Braintree and PayPal accounts are set up. Our base vue project should also be set up by now so let’s continue!
Project Setup Continued
When you’re app is finished being created, follow the instructions in the terminal to start your app.
Next let’s clean up our base project. We can clear out most of the code. So delete the components and assets folders. Then open the App.vue file. You can delete everything in the template section, remove the code in the script section so it’s essentially exporting an empty object and also clear out the style section.
Your App.vue file should now look like this:
<template>

</template>

<script>
export default {

}
</script>

<style>

</style>
Next we’re going to add bootstrap to our project so we can have some nice styling. Open the public/index.html file and add this bit of code to the <head> section:
<link rel="stylesheet" href="https://stackpath.bootstrapcdn.com/bootstrap/4.1.3/css/bootstrap.min.css" integrity="sha384-MCw98/SFnGE8fJT3GXwEOngsV7Zt27NXFoaoApmYm81iuXoPkFOJwJ8ERdknLPMO" crossorigin="anonymous">
Then you’ll need to make a normal form with one input field where a user can enter an amount. Since this is essentially all html, I’ve provided a template below for you to copy or if you want some practice, code a form out on your own.
Here’s my code:
<template>
    <div class="container">
       <div class="col-6 offset-3">
           <div class="card bg-light">
               <div class="card-header">Payment Information</div>
               <div class="card-body">
                   <form>
                       <div class="form-group">
                           <label for="amount">Amount</label>
                           <div class="input-group">
                               <div class="input-group-prepend"><span class="input-group-text">$</span></div>
                               <input type="number" id="amount" class="form-control" placeholder="Enter Amount">
                           </div>
                       </div>
                   </form>
               </div>
           </div>
       </div>
   </div>
</template>

<script>
export default {

}
</script>

<style>
   body {
       padding: 20px;
   }
</style>
Braintree Hosted Fields
You may be wondering why we’ve only added an amount field on this form if we need to ask for credit card information. We’ll that’s because it’s safer to not have those input fields on our page. Braintree can host the input fields on their servers so no sensitive information ever touches us. The input fields will be in an iframe, so it will still look like the form is on our page to the end user.
To start using Braintree hosted fields we need to install Braintree’s Javascript SDK. So, open a terminal in your project’s directory and type the following:
npm install --save braintree-web
Once it’s finished installing, go to the script section of your code and import the library like so:
<script>
import braintree from 'braintree-web';

export default {

}
</script>
The way hosted fields work is that you provide a container for each field to be placed and the SDK loads the input fields into those containers. So for example, we’d create an empty div with an id of creditCardNumber which would hold the credit card input field. We’d do the same for the expiration date and cvv. You can visit the Braintree docs for all of the available fields you can use with hosted fields.
Now that we know a little more about how hosted fields work, let’s finish out our credit card form. We’ll collect the credit card number, expiration date and cvv. In the places that an input field would normally go, replace it with an empty div. One extra trick to note is that the hosted fields come as transparent input fields. So you can style the container div’s to look like input fields and the user wouldn’t know the difference. Since we’re using bootstrap, we can just add the form-control class to our divs and it will make it look like a textbox.
If you can, finish out the form on your own and if you are stuck, you can take a look at my code below:
<form>
   <div class="form-group">
	   <label for="amount">Amount</label>
	   <div class="input-group">
		   <div class="input-group-prepend"><span class="input-group-text">$</span></div>
		   <input type="number" id="amount" class="form-control" placeholder="Enter Amount">
	   </div>
   </div>
	<hr />
   <div class="form-group">
	   <label>Credit Card Number</label>
	   <div id="creditCardNumber" class="form-control"></div>
   </div>
   <div class="form-group">
	   <div class="row">
		   <div class="col-6">
			   <label>Expire Date</label>
			   <div id="expireDate" class="form-control"></div>
		   </div>
		   <div class="col-6">
			   <label>CVV</label>
			   <div id="cvv" class="form-control"></div>
		   </div>
	   </div>
   </div>
</form>
The above should be pretty self explanatory. It’s all still normal html with some bootstrap classes for styling. The only unusual thing we’ve done so far is replace input fields for divs. If you look at your app in the browser it will look like a form except we can’t actually type in the div fields. We’ll be fixing that next.
In the script section, add a mounted method to our exported object. Mounted is a special lifecycle hook method that Vue.js has. Any code in there is ran when the app mounts to the page. We’ll be putting our Braintree code here. It’s a little tough to explain without seeing it so I’ll give you the code and explain it below.
<script>
import braintree from 'braintree-web';

export default {
   mounted() {
       braintree.client.create({
           authorization: "YOUR_AUTHORIZATION_KEY"
       })
       .then(clientInstance => {
           let options = {
               client: clientInstance,
               styles: {
                   input: {
                       'font-size': '14px',
                       'font-family': 'Open Sans'
                   }
               },
               fields: {
                   number: {
                       selector: '#creditCardNumber',
                       placeholder: 'Enter Credit Card'
                   },
                   cvv: {
                       selector: '#cvv',
                       placeholder: 'Enter CVV'
                   },
                   expirationDate: {
                       selector: '#expireDate',
                       placeholder: '00 / 0000'
                   }
               }
           }

           return braintree.hostedFields.create(options)
       })
       .then(hostedFieldInstance => {
           // @TODO - Use hostedFieldInstance to send data to Braintree
       })
       .catch(err => {

       });
   }
}
</script>
Here we’re using the Braintree SDK to first create a client instance. Then we’re configuring the hosted fields and using the client instance to create them. Replace any of the selectors with the ID’s you used if you aren’t copying my template. If you want more information on how I got this code see the Braintree documentation here and here.
Two thing’s you’ll probably notice from the code is the YOUR_AUTHORIZATION_KEY part and the todo comment. We’ll need an authorization key to actually use the Braintree SDK. To get this, go to your Braintree dashboard. In the Settings menu at the top click on API Keys. Then on the next page in the Tokenization Keys section, click on Generate New Tokenization Key. It should look something similar to sandbox_xxxxx_xxxxxxxx. Copy your key and paste it into the placeholder in our code.
Next we need to work on the todo part. After you paste the authorization key into the code and save your app, you should see the fields are placed in our form and you’re able to type in them. We’re missing one thing to make this work, and that’s a submit button! So let’s do that now.
Under the last form group add a button. Then we need to add a click event to this button that will send the information in our form off to Braintree. To do that we need the hostedFieldInstance that we have access to where the todo comment is. We can do this using vanilla javascript, or a better way, since we’re using Vue.js, we can add the hostedFieldInstance as a data property to our app. Then create a method that uses the hostedFieldInstance to submit the data to Braintree.
Hopefully that made sense? If doesn’t, don’t worry we’re going to take this one step at a time. So first, let’s create a data property on our Vue app that will hold the hostedFieldInstance. To do that you’ll need to create the data method and then have it return an object with hostedFieldInstance as a property. By default, it can be set to false. If you can, write that code out yourself or take a look at my code below:
data() {
   return {
	   hostedFieldInstance: false
   }
}
Next, where our todo comment is, replace it with code that sets our hostedFieldInstance data property equal to the hostedFieldInstance variable that’s returned in the promise. Here’s the updated code for that:
.then(hostedFieldInstance => {
   // Use hostedFieldInstance to send data to Braintree
   this.hostedFieldInstance = hostedFieldInstance;
})
Now we have access to the hostedFieldInstance outside of the mounted method. We can use it in a normal Vue method. So let’s create a method on our Vue object that will be triggered when the button is clicked. Here’s the code for that:
methods: {
   payWithCreditCard() {
	   if(this.hostedFieldInstance)
	   {
		   this.hostedFieldInstance.tokenize().then(payload => {
			   console.log(payload);

		   })
		   .catch(err => {
			   console.error(err);

		   })
	   }
   }
}
Here we’re using the hostedFieldInstance to tokenize the information in our credit card form. When it’s successful, the payload will have a property called nonce, which is the token that we use on our backend to create the actual payment.
The last thing we need to do is hook this method up to our button. Add the event listener on the button to trigger this method like so:
<button class="btn btn-primary btn-block" @click.prevent="payWithCreditCard">Pay with Credit Card</button>
I’m using the event modifier prevent here to prevent the form from actually being submitted when the button is clicked. If you want more information on those check out the Vue.js docs here.
Now that our button is connected, if you open up dev tools in your browser and go to the console tab you’ll be able to see the payload (or error) that occurs when you submit the form.
So let’s test this out. For credit card number, enter 4111 1111 1111 1111. Then for expiry date enter any non expired date and for cvv, any 3 numbers should work.
You should see something similar to the following in your dev console:

The important part is the nonce. You’ll need to make an ajax call that submits this to your server and use it to create a payment. Alternatively you can put this value in a hidden field and actually submit the form to the server. Either way, you’ll use this token to create the payment. Since the nonce is the thing we need, let’s save it to a data property and show a success message.
Here’s what your data should look like after adding the nonce property:
data() {
   return {
	   hostedFieldInstance: false,
	   nonce: ""
   }
}
Then just under the console.log(payload) line in our payWithCreditCard method, set our nonce property equal to payload.nonce.
Then in our template, above our form we’ll add a success message when the nonce is populated. To do that you can use v-if to determine if you want to show or hide the success message. If you can, try writing that out on your own. Otherwise here’s my code for that:
<div class="card bg-light">
   <div class="card-header">Payment Information</div>
   <div class="card-body">
	   <div class="alert alert-success" v-if="nonce">
		   Successfully generated nonce.
	   </div>
	   <form>
Next let’s handle errors. So, with your dev console open, try submitting the form when it’s empty. You should see an error similar to this one:

You can see it gives you a message property that we can technically use to show the user. But it isn’t very user friendly. For the purposes of this tutorial we won’t be replacing this error, but in a production environment it’s probably best to take a look at the code field and then based on that use your own error message.
Here is a list of all the possible tokenization error codes:
- HOSTED_FIELDS_TOKENIZATION_NETWORK_ERROR
- HOSTED_FIELDS_TOKENIZATION_FAIL_ON_DUPLICATE
- HOSTED_FIELDS_TOKENIZATION_CVV_VERIFICATION_FAILED
- HOSTED_FIELDS_FAILED_TOKENIZATION
- HOSTED_FIELDS_FIELDS_EMPTY
- HOSTED_FIELDS_FIELDS_INVALID
The one’s you’ll run into most often are the empty, invalid and cvv verification ones, but you should look for each of these and create your own error message. For more information on what each of these refer to, take a look at the docs.
So for this tutorial, we’ll just show the error message that Braintree returns. Add a new property to your data object called error like so:
data() {
   return {
	   hostedFieldInstance: false,
	   nonce: "",
	   error: ""
   }
}
Then in the catch portion of our payWithCreditCard method, set our error data property equal to the err.message value that’s returned:
.catch(err => {
   console.error(err);
   this.error = err.message;
})
Next, let’s add an error message to our template that shows when an error occurs. Here’s my code for that, but if you can, try writing it on your own:
<div class="alert alert-danger" v-if="error">
   {{ error }}
</div>
One final thing you should do is clear out the nonce and error message when the button is clicked. That way our error and success messages get reset when someone tries to resubmit the form. Here’s the final code for our payWithCreditCard method after making that change:
payWithCreditCard() {
   if(this.hostedFieldInstance)
   {
	   this.error = "";
	   this.nonce = "";

	   this.hostedFieldInstance.tokenize().then(payload => {
		   console.log(payload);
		   this.nonce = payload.nonce;
	   })
	   .catch(err => {
		   console.error(err);
		   this.error = err.message;
	   })
   }
}
With that, we’re finished with the credit card portion of our form! Next we’ll work on adding PayPal as an option.
PayPal Button
The PayPal button works similar to hosted fields in that you have an empty div container with an id and then the SDK will fill it with the actual button. So, to start, let’s add it to our template just under the “Pay with Credit Card” button. Here’s my updated template after doing so:
<template>
    <div class="container">
       <div class="col-6 offset-3">
           <div class="card bg-light">
               <div class="card-header">Payment Information</div>
               <div class="card-body">
                   <div class="alert alert-success" v-if="nonce">
                       Successfully generated nonce.
                   </div>
                   <div class="alert alert-danger" v-if="error">
                       {{ error }}
                   </div>
                   <form>
                       <div class="form-group">
                           <label for="amount">Amount</label>
                           <div class="input-group">
                               <div class="input-group-prepend"><span class="input-group-text">$</span></div>
                               <input type="number" id="amount" class="form-control" placeholder="Enter Amount">
                           </div>
                       </div>
                        <hr />
                       <div class="form-group">
                           <label>Credit Card Number</label>
                           <div id="creditCardNumber" class="form-control"></div>
                       </div>
                       <div class="form-group">
                           <div class="row">
                               <div class="col-6">
                                   <label>Expire Date</label>
                                   <div id="expireDate" class="form-control"></div>
                               </div>
                               <div class="col-6">
                                   <label>CVV</label>
                                   <div id="cvv" class="form-control"></div>
                               </div>
                           </div>
                       </div>
                       <button class="btn btn-primary btn-block" @click.prevent="payWithCreditCard">Pay with Credit Card</button>
                       <hr />
                       <div id="paypalButton"></div>
                   </form>
               </div>
           </div>
       </div>
   </div>
</template>
In order to render the PayPal button we will need the paypal-checkout library. To install that, open a terminal and navigate to your project’s root directory. Then type the following command:
npm install --save paypal-checkout
When that’s finished installing, we need to import it at the top of our script section like so:
import paypal from 'paypal-checkout';
Next, head to the mounted method we wrote earlier. In the promise which has the clientInstance returned, where we configure the hosted fields, we need to set up paypal checkout. To do that, we are going to re-work this part of the code. Just like how the clientInstance is part of the options that are passed to the hostedFields create method, we need to pass the clientInstance to the paypal checkout creation method. Here is how you create a paypalCheckoutInstance:
braintree.paypalCheckout.create({ client: clientInstance })
Currently our promise is returning the following:
return braintree.hostedFields.create(options)
We need to include the creation of the PayPal Checkout button with the hosted fields creation. To do that we can use Promise.all. If you don’t know, Promise.all takes an array of promises and returns all of them to the next then block. So, instead of returning braintree.hostedFields.create(options), we can create an array with both braintree.hostedFields.create(options) and braintree.paypalCheckout.create({ client: clientInstance }) as elements. In the then block that follows we can get both instances. Here’s what that looks like:
mounted() {
   braintree.client.create({
	   authorization: AUTH_KEY
   })
   .then(clientInstance => {
	   let options = {
		   client: clientInstance,
		   styles: {
			   input: {
				   'font-size': '14px',
				   'font-family': 'Open Sans'
			   }
		   },
		   fields: {
			   number: {
				   selector: '#creditCardNumber',
				   placeholder: 'Enter Credit Card'
			   },
			   cvv: {
				   selector: '#cvv',
				   placeholder: 'Enter CVV'
			   },
			   expirationDate: {
				   selector: '#expireDate',
				   placeholder: '00 / 0000'
			   }
		   }
	   }

	   return Promise.all([
		   braintree.hostedFields.create(options),
		   braintree.paypalCheckout.create({ client: clientInstance })
	   ])

   })
   .then(instances => {

	   const hostedFieldInstance    = instances[0];
	   const paypalCheckoutInstance = instances[1];

	   // Use hostedFieldInstance to send data to Braintree
	   this.hostedFieldInstance = hostedFieldInstance;

	   // @todo: Setup PayPal Button

   })
   .catch(err => {

   });
}
Now that we have the paypal checkout instance, we can create the button. Just after the todo comment add this bit of code:
return paypal.Button.render({
   env: 'sandbox',
   style: {
	   label: 'paypal',
	   size: 'responsive',
	   shape: 'rect'
   },
   payment: () => {
	   return paypalCheckoutInstance.createPayment({
			   flow: 'checkout',
			   intent: 'sale',
			   amount: 10,
			   displayName: 'Braintree Testing',
			   currency: 'USD'
	   })
   },
   onAuthorize: (data, options) => {
	   return paypalCheckoutInstance.tokenizePayment(data).then(payload => {
		   console.log(payload);
		   this.error = "";
		   this.nonce = payload.nonce;
	   })
   },
   onCancel: (data) => {
	   console.log(data);
	   console.log("Payment Cancelled");
   },
   onError: (err) => {
	   console.error(err);
	   this.error = "An error occurred while processing the paypal payment.";
   }
}, '#paypalButton')
Here we’re using the paypal-checkout library that we imported earlier to create the button. We’re first setting the environment to sandbox and then adding some styling. For more styles see this page.
The next 4 methods all have to do with actions the user takes. The payment method is triggered when the user clicks on the PayPal button. Inside the method we’re setting up the payment information. For a detailed explanation of each of these options see the docs here. The main ones you’ll generally want to use are the ones I’ve listed in the code.
The onAuthorize method is triggered after the user has interacted successfully with the PayPal popup and allowed the charge to go through. Here we’re tokenizing the data that are passed back and then getting a nonce like we did with the hosted fields.
The onCancel method is triggered when the user closes the PayPal popup before authorizing the charge. Here we’re just console logging so we can see it working.
And lastly, the onError runs when an error occurs.
With that, if you save and go back to your app in the browser you should be able to see the PayPal button and you should be able to click on it. When it opens, a prompt will show asking you to login. Here you’re going to want to use the credentials for the PayPal sandbox account we created earlier. If all goes well, you should be able to login, authorize the payment and the success message should show on our form.
If you take a look at the dev console you’ll be able to see the payload that comes back to us with a nonce property.
One final thing we want to do is connect the amount input field so we can pass it to the amount config in our PayPal button. To do that we’ll need a new data property and then using v-model connect it to the amount input field. Try doing this on your own and then continue on below.
Here’s our updated data properties after making that change:
data() {
   return {
	   hostedFieldInstance: false,
	   nonce: "",
	   error: "",
	   amount: 10
   }
}
And here’s the input field with the amount attached to it:
<input type="number" id="amount" v-model="amount" class="form-control" placeholder="Enter Amount">
Now we need to update the PayPal button config to use this amount. One thing you should know is that you’ll need an amount when using the checkout flow. So we need to check if amount is greater than zero before using it in the config. If it’s not, we’ll just use a default value of 10.
If you can try making that change on your own and if you get stuck take a look at my code:
return paypalCheckoutInstance.createPayment({
	   flow: 'checkout',
	   intent: 'sale',
	   amount: parseFloat(this.amount) > 0 ? this.amount : 10,
	   displayName: 'Braintree Testing',
	   currency: 'USD'
})
That’s pretty much it! We’re finished adding the PayPal button. Normally now you’d show the user a review of their order and give them a button to confirm. At that point you’d send the nonce to your server to create the payment.
If you got stuck at any point along the way here’s the full code for the project:
<template>
     <div class="container">
        <div class="col-6 offset-3">
            <div class="card bg-light">
                <div class="card-header">Payment Information</div>
                <div class="card-body">
                    <div class="alert alert-success" v-if="nonce">
                        Successfully generated nonce.
                    </div>
                    <div class="alert alert-danger" v-if="error">
                        {{ error }}
                    </div>
                    <form>
                        <div class="form-group">
                            <label for="amount">Amount</label>
                            <div class="input-group">
                                <div class="input-group-prepend"><span class="input-group-text">$</span></div>
                                <input type="number" id="amount" v-model="amount" class="form-control" placeholder="Enter Amount">
                            </div>
                        </div>
                         <hr />
                        <div class="form-group">
                            <label>Credit Card Number</label>
                            <div id="creditCardNumber" class="form-control"></div>
                        </div>
                        <div class="form-group">
                            <div class="row">
                                <div class="col-6">
                                    <label>Expire Date</label>
                                    <div id="expireDate" class="form-control"></div>
                                </div>
                                <div class="col-6">
                                    <label>CVV</label>
                                    <div id="cvv" class="form-control"></div>
                                </div>
                            </div>
                        </div>
                        <button class="btn btn-primary btn-block" @click.prevent="payWithCreditCard">Pay with Credit Card</button>
                        <hr />
                        <div id="paypalButton"></div>
                    </form>
                </div>
            </div>
        </div>
    </div>
</template>

<script>
import braintree from 'braintree-web';
import paypal from 'paypal-checkout';

export default {
    data() {
        return {
            hostedFieldInstance: false,
            nonce: "",
            error: "",
            amount: 10
        }
    },
    methods: {
        payWithCreditCard() {
            if(this.hostedFieldInstance)
            {
                this.error = "";
                this.nonce = "";

                this.hostedFieldInstance.tokenize().then(payload => {
                    console.log(payload);
                    this.nonce = payload.nonce;
                })
                .catch(err => {
                    console.error(err);
                    this.error = err.message;
                })
            }
        }
    },
    mounted() {
        braintree.client.create({
            authorization: "sandbox_93smtrz3_bbgx4xf7h8bx24xg"
        })
        .then(clientInstance => {
            let options = {
                client: clientInstance,
                styles: {
                    input: {
                        'font-size': '14px',
                        'font-family': 'Open Sans'
                    }
                },
                fields: {
                    number: {
                        selector: '#creditCardNumber',
                        placeholder: 'Enter Credit Card'
                    },
                    cvv: {
                        selector: '#cvv',
                        placeholder: 'Enter CVV'
                    },
                    expirationDate: {
                        selector: '#expireDate',
                        placeholder: '00 / 0000'
                    }
                }
            }

            return Promise.all([
                braintree.hostedFields.create(options),
                braintree.paypalCheckout.create({ client: clientInstance })
            ])

        })
        .then(instances => {

            const hostedFieldInstance    = instances[0];
            const paypalCheckoutInstance = instances[1];

            // Use hostedFieldInstance to send data to Braintree
            this.hostedFieldInstance = hostedFieldInstance;

            // Setup PayPal Button

                return paypal.Button.render({
                    env: 'sandbox',
                    style: {
                        label: 'paypal',
                        size: 'responsive',
                        shape: 'rect'
                    },
                    payment: () => {
                        return paypalCheckoutInstance.createPayment({
                                flow: 'checkout',
                                intent: 'sale',
                                amount: parseFloat(this.amount) > 0 ? this.amount : 10,
                                displayName: 'Braintree Testing',
                                currency: 'USD'
                        })
                    },
                    onAuthorize: (data, options) => {
                        return paypalCheckoutInstance.tokenizePayment(data).then(payload => {
                            console.log(payload);
                            this.error = "";
                            this.nonce = payload.nonce;
                        })
                    },
                    onCancel: (data) => {
                        console.log(data);
                        console.log("Payment Cancelled");
                    },
                    onError: (err) => {
                        console.error(err);
                        this.error = "An error occurred while processing the paypal payment.";
                    }
                }, '#paypalButton')
        })
        .catch(err => {

        });
    }
}
</script>

<style>
    body {
        padding: 20px;
    }
</style>
I hope this helped you figure out how to use Braintree and PayPal with Vue.js. If you have any questions feel free to leave a comment below!