Git can be a pain to learn when you’re first starting out. It didn’t actually click with me until I started using it everyday when I got a job. So, I thought it would be good to put together this little tutorial that I wish I had seen before starting my job. It would have helped me to understand git a whole lot more.
Installing Git
To start if you haven’t done so already, you’ll need to install git on your computer. Go to https://git-scm.com/downloads and download the version for your operating system. I’m on Windows, but the processes should be pretty similar for Mac and Linux.
Initializing your repository
Once it’s finished installing head over to file explorer and create a new directory where you want to store your repo. If you right click on that directory, you should now see some new options that say “Git GUI Here” and “Git Bash Here”. We’re going to be using both of those. For creating a repo though, I think using the command line is easier. So, choose the Git Bash Here option and let the terminal load. Then type the following:
git init
That will create/initialize your git repo. If you go into the folder you should see a .git folder. This holds the configuration of our repo. You don’t really need to worry about it now. We won’t be adding anything to this folder or making any changes to the files in it. Once you get more advanced you may need to modify things in here, but for now you can just leave it.
Next we’ll work on saving changes to any files we add to our repo.
Commiting Changes
In your repo, create a new file called first.txt. Inside type “Hello World” and save. To save or in git terms, commit, we’re going to use a GUI. You can also do this from command line, but I think when you’re starting out, committing from a GUI is a whole lot easier. So, right click anywhere in the directory where your first.txt file is and choose “Git GUI Here”. You should see something like this:
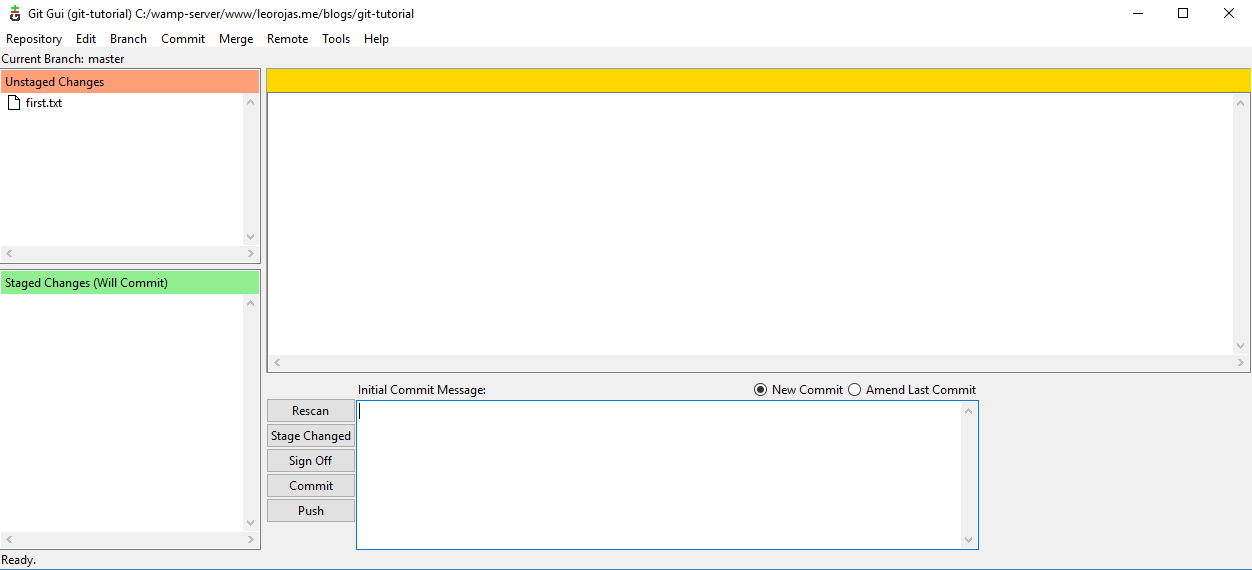
The “Unstaged Changes” section will list any file that has changes inside our repo. Click on the file icon next to the file name to add it to the “Staged Changes” section. This tells git that we want to save it to our repo. Next you need to type a message into the “Initial Commit Message” text box. This can be whatever you want. Usually you’ll want to put something that describes the changes you made. For this one I will put “first commit” as the message. Then click the Commit button. You’ve just saved the file to git!
Technically, this is all you really need to do. Any changes you make to files you add them to the staged section and then commit. However, it is usually a good idea to host your git repository somewhere so it’s not just on your computer. That way if something happens to your computer, your code isn’t gone forever.
So, in the next step we’re going to setup a GitHub account and host our repository on there.
GitHub
If you’ve been trying to learn git, you almost certainly have heard of GitHub. It’s probably the most popular place to host a git repository. There are others, such as Gitlab and Bitbucket, but for this tutorial we’ll use GitHub.
If you don’t already have one, create a GitHub account. Once that’s all set up, in the top right dropdown menu, click “Your Repositories”. Then click the green “New” button. Give your repository whatever name you want. Generally all lowercase with spaces replaced by dashes (kebab case). You don’t need a description, but you can put one if you want. You can make it public or private. If it’s private, only you and anyone you give access to can see it. If you make it public, the entire world can see your code. For this tutorial, we’re going to make our repository public. You can leave the remaining fields default and click Create Repository.
Now you’re going to be on a page with some instructions. Make sure you have the HTTPS option (instead of SSH) selected. Then we’re going to use the second set of instructions, the ones that are just below the: “…or push an existing repository from the command line” line.
So, copy the first command. It should look something like this:
git remote add origin https://github.com/[YOUR_GIT_USERNAME]/[YOUR_REPOSITORY_NAME].git
Then go to your git bash terminal window and paste it in. Then copy the next line and paste it into the terminal as well. You’ll be asked for your GitHub credentials, enter them, and then your repository will be up on GitHub!
Refresh the instructions page and you should see your first.txt file!
Making additional changes
Now let’s make a few more changes to our files and do a few more commits so you can see a little more of what goes on. So, open the first.txt file and add some more text to it. Then create a new file called second.txt and put some text in there as well.
Then open Git GUI. If you never closed it from the first commit we made, you’ll see there are no files showing up in the “Unstaged Changes” section. You need to refresh the screen. So with the window active, press F5 and it will refresh. You should now see the first.txt and the second.txt file.
When you select either file, you should see the changes that were made on the right panel. Generally you’ll want to review these changes before you commit to make sure you didn’t make any mistakes in your code.
Click the file icons next to the file names to add them to staging. Then write a message in the “Commit Message” text box and click Commit. Now, since we’ve added a remote repository (GitHub), we can push our changes as well. Think of this as uploading our code to GitHub. There is a button in the GUI that says Push, however, it is a whole lot easier to do this from the command line. The GUI window makes things a little confusing and doesn’t always work. So, go back to the git bash terminal window and type the following:
git push origin master
You’ll be asked for your GitHub credentials again. Fill that out and then go back to GitHub and refresh your page. Your new changes should now be there!
Now, let me explain the push command a little bit before we continue. The “origin” part, is telling git which remote repository to push it to. You can technically have multiple remote repositories if you had to. Most of the time however, you’re just going to have one. I wouldn’t get to stuck on this until you get more used to using git.
The “master” part of that command is the name of the branch. The master branch is automatically created for us when we create our repository. Branches are essentially different sets of your code. We’ll go into branches more in the next section.
Creating Branches
Like I said above, branches are separate sets of your code. Branches are useful because it allows you to work on new features of your app without messing with the code that you know already works. Making new branches also helps when you’re working in a team. It allows people to work on different parts of the code at the same time. Then you eventually merge everything together.
So, let’s create a new branch! To do that, we’re going to use the git bash terminal. Inside type the following:
git checkout -b second-branch
This will take a copy of the current branch that we’re on (master) and create a new branch called “second-branch”.
Now we can make changes to our files again and commit them like we’ve done before. So, open the first.txt and the second.txt file and make some changes. Also, create a new file called third.txt and add some text to it.
Then go back to your Git GUI and refresh (press F5). Add the files to staging, put a commit message and press commit.
Then open the git bash terminal and type the following:
git push origin second-branch
You’ll notice here we’re pushing to the second-branch rather than master like we did the first time.
Now, go to GitHub and refresh. Your repository should look the same. However, if you click on the dropdown that has the text “Branch: master”, you should see our new “second-branch”. Click on it and you’ll be able to see our files in the new branch. Great!
Next, we’re going to merge our changes in second-branch into the master branch.
Merging
Merging is what it sounds like. It merges the changes you make in one branch into another branch. Sometimes there will be collisions that you’ll need to fix, but I would not worry about those until you get more comfortable using git. You most likely won’t run into any if you’re working solo and not working on multiple branches at once.
We’re going to merge the changes we made in the second-branch into our master branch. To do that, we first need to be on our master branch. Open your git bash terminal and type the following:
git checkout master
This will move us back to our code set on the master branch. If you notice, the repo on your computer no longer has the third.txt file and the changes you made on the second branch are no longer there. This freaked me out when I first started messing around with branches when I had no clue what I was doing. I thought I lost everything :D. So, just be aware that this is what happens when you move to (checkout) different branches. Your changes aren’t lost, they’re just on a different branch. If you wanted to go back to the second branch you’d type: git checkout second-branch in your git bash terminal.
Now that we’re on the master branch, we can merge. To do that, in your git bash terminal type:
git merge --no-ff second-branch
This will either open a new text editor for you or will show you a text editor in the terminal. If the text editor is in the terminal, type :quit and then press enter. If a new text editor opened, you can simply close it.
The “–no-ff” part of the command merges the changes from second-branch and includes a new commit. It’s not necessary to include this, but I like to see where the merge happened in my git history so I think including it is useful. If you don’t include the “–no-ff”, you won’t necessarily know when you made the merge.
Now we need to push our changes to GitHub. So type the following your git bash terminal:
git push origin master
Now, back to GitHub and in the branch dropdown menu, select master. You should now see the third file has been added! If you click on the “commits” link (there should be a 4 next to it) you’ll see a history of all the commits we made. And like I said above, if you hadn’t put the “–no-ff” you wouldn’t see the “Merge branch ‘second-branch'” commit in the history.
That’s pretty much it for the basics. Hopefully this was helpful for you if you were struggling with understanding how to use git. The best way to get better is to keep practicing and using git when you’re working on your projects. The more you use it, the more comfortable you get with it. One thing you should eventually look into is using an SSH key to authenticate when you are pushing your changes. It’s more secure and actually makes your workflow a lot less tedious because you don’t need to log in every time you want to push changes. But, I think using the login/HTTPS version is fine for beginners.
If you have any questions or feedback feel free to leave a comment below!